Tag Archives: Freezing

Time to Get Blueberries in Your Freezer?

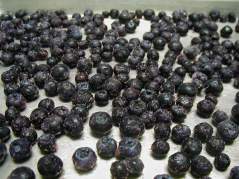
Fresh blueberries laid out in single layer on a tray


Fresh blueberries are in abundant supply in many states now.  Blueberries are easy to freeze and maintain great quality for year-round use in favorites such as muffins, pancakes, and smoothies.  They are nutrient dense and add freshness and flavor to meals.

Blueberries can be prepared for freezing using two methods.  Dry pack and crushed or puŕeed. If you can’t freeze right after picking, refrigerate at 40 degrees F or below until ready to prepare and freeze. Work with small batches to prevent loss of nutrients and quality.

Dry pack is the easiest method.  Most advice says do not wash the blueberries; the skins will toughen if frozen wet. (If you do want to rinse them off with clean water, be sure to completely dry again before packaging and freezing.) Remove leaves, stems, and any bruised or immature berries. Package berries into moisture vapor resistant packaging, either rigid plastic or flexible bags.  Leave headspace.

Tray freezing before dry packaging allows blueberries to remain loose; and easier to remove in smaller amounts.  Spread a single layer of berries on shallow trays and freeze.  Once frozen, remove and promptly package.  Return to the freezer immediately.  When ready to use, remove from packaging and wash blueberries thoroughly by gently rubbing under cold running water.

Crushed or puréed is another method for freezing blueberries.  To prepare for freezing, remove leaves, stems, and any bruised or immature berries.  Wash blueberries thoroughly by gently rubbing under cold running water. Drain in a colander and blot dry with paper towels.

Crush, press through a fine sieve, or process in a food processor or blender. Mix with 1 to 1-1/8 cups sugar with each quart (2 pounds) of crushed berries or purée.  Stir until sugar is dissolved.  Package in freezer containers, leaving headspace.  Label, seal, and freeze promptly.   Keep an accurate inventory of the freezer.  Use first in, first out method to use blueberries at peak quality.

If you plan on using your frozen berries at a later time to make jam or jelly, freeze them unsweetened or follow the proportions of sugar to berries in the jam recipe you will eventually use.

Taking time to freeze fresh blueberries with care will provide delicious, high quality, and nutritious fruit for use year-round.

(The links on this page can be found at https://nchfp.uga.edu)

###

It’s Peak Apple Time

Fall weather brings the best fresh apples in bushels.  While we are in a season of peak applechutneysmallapple production in many states, you might consider preserving some specialties that will add variety to menus throughout the year.  Apples can be dried, made into applesauce or apple butter, or even made into a delicious apple pear jam. Those who treasure the crispness of fresh apples will not be impressed by soft canned or frozen apple slices, but they can be preserved by those methods, also.

Whether you are buying apples by visiting the nearby orchard, the grocery store or market, or even picking apples from your own backyard, choose the preservation method that is best for your apple variety. Varieties that are good for freezing include: Golden Delicious, Rome Beauty, Stayman, Jonathan and Granny Smith. Varieties that are good for making applesauce and apple butter include: Golden Delicious, Rome Beauty, Stayman, Jonathan, Gravenstein and McIntosh. Red Delicious apples are best eaten fresh. They do not freeze or cook well in most opinions.  There are so many newer varieties in the last few years, it will take some time to get this list updated, but it is a starting place for your choices.

When selecting your apples for preserving, choose apples that are free of defects, such as bruises, skin breaks and decayed spots. Little brown spots appearing solely on the skin of the apple, called “russeting,” does not affect quality of the tissue underneath. Beware and on the lookout for browning or broken skins that are evidence of actual spoilage such as rotting or mold.

If making applesauce, apple butter or dried slices with your apples, use them as soon as possible after harvest. If any apples must be stored, keep them in a cool, dark place. They should not be tightly covered or wrapped up; a perforated plastic or open paper bag, basket or wooden crate are good choices. If kept in the refrigerator, apples should be placed in the humidifier compartment or in a plastic bag with several holes punched in it (or in a zipper-type vegetable bag). This prevents loss of moisture and crispness. Apples should not be placed close to foods with strong odors since the odor may be picked up by the apples.

Here are some options to prepare for and choose from in preserving your apples:

Making and canning a flavorful applesauce:
http://www.uga.edu/nchfp/how/can_02/applesauce.html

Making and canning a tasty, robust apple butter:
http://www.uga.edu/nchfp/how/can_02/apple_butter.html

For those who want a no-sugar added apple butter:
(ours was developed  for sucralose as a sweetener but no sweetener is necessary)
http://nchfp.uga.edu/how/can_02/apple_butter_reduced.html

Drying apple slices or rings:
http://www.uga.edu/nchfp/publications/uga/uga_dry_fruit.pdf

Combining the best of fall fruits in tasty pear-apple jam:
http://www.uga.edu/nchfp/how/can_07/pear_apple_jam.html

Making old-fashioned, pretty crabapple jelly:
http://www.uga.edu/nchfp/how/can_07/crabapple_jelly.html

Canning a special, spicy gift-quality apple chutney: apple chutney
http://www.uga.edu/nchfp/how/can_06/apple_chutney.html

And if you like the option of a spicy pickled profile, also check out this apple relish:
http://nchfp.uga.edu/how/can_06/harvest_apple_relish.htm

And, for all those extra apple slices to save for pies and desserts later in the year, freezing:
http://www.uga.edu/nchfp/how/freeze/apple.html

For more information on canning and freezing methods, including packaging choices and headspace for freezer containers, see general sections on these topics available from the National Center for Home Food Preservation at the University of Georgia, https://nchfp.uga.edu.

###

Vidalia Onions Are In!

It’s May in Georgia and that means Vidalia onion season. While these are famous for their sweet flavor, there are numerous varieties and colors of onions. Onions are used in many unique, flavorful condiments – relishes, salsas, pickles, and jams to name some of the most common. Sometimes we just need to preserve onions themselves.

I’m often asked why our University of Georgia So Easy to Preserve book does not have the option of freezing diced onions. Well, I can’t explain why it was never in the early editions and we just haven’t been able to issue a whole new edition since the 6th edition in 2014. This is one of the drawbacks of a large book that you don’t revise or reproduce for one issue at a time.  We have had this additional option on our Freezing Onions page at the National Center for Home Food Preservation for the past few years:
https://nchfp.uga.edu/how/freeze/onion.html

Peeled, washed onions can be diced or chopped (1/4-1/2 inch pieces suggested) and frozen without blanching. If you have room in your freezer, it is best to spread the pieces out on a clean cookie/baking sheet in a single layer.  When they are frozen (hardened), promptly remove from the tray and package air-tight in freezer bags or containers while they are still hard.  This keeps pieces separated in their freezer packaging enough that you will be able to remove only as much as you want at a time.  If they are all put into the bag or container at room temperature, they will freeze into one large mass and not as separate pieces. If you are going to remove part of the amount frozen at a time versus using the whole amount, it works best to use freezer bags, so you can push the air out when you re-seal the remaining frozen pieces.  In a hard container, the air left in the box/jar as you keep removing some is not good for quality and can cause freezer burn (drying out of the food).

The National Center for Home Food Preservation also has this webpage with more ideas and tips for preserving onions: https://nchfp.uga.edu/tips/summer/onions.html.  At the end of it, there are links to our Canning Relishes factsheet with several that emphasize onions and others that contain some onion content.

###

Freezing Soups and Stews A Good Wintertime Activity

It is still chilly and winter in most locations. Even here in Georgia we are still swinging between chilly and warm. Today would have been my mother’s birthday and that reminds me of how she loved to use her freezer for convenience in meal preparation.

There is nothing like a hot bowl of homemade soup or chili on a chilly winter’s day. But not everyone has time or ingredients to make it when the mood strikes or it’s time to eat. Just imagine having a freezer full of delicious, homemade meals ready to be heated and served when you get home from work. Freezing prepared foods in advance allows you the satisfaction of homemade meals with the convenience of store-bought ones. A lot of people have gone the route of instant cookers and fast preparation, but for some, making ahead and just reheating is even a quicker answer.  (Believe me, I also have my favorite stovetop soups that cook up quickly, even with lots of flavor, but that does require I have the ingredients on hand when the mood strikes.)

There are just a few things to keep in mind when freezing prepared foods. Freezing will not improve the texture, flavor, or quality of most food. It simply acts to preserve the quality of the food. Therefore, you should only freeze high quality ingredients. Some ingredients may not hold up well in the freezer, especially if you don’t plan to use it quickly this season only. You can look up some cautions and effects of freezing on spices ahead of time (http://www.uga.edu/nchfp/how/freeze/dont_freeze_foods.html).  Other tips for freezing prepared foods can be found from the University of Georgia also (http://www.uga.edu/nchfp/publications/uga/FreezingPreparedFoods.pdf).

After cooking the food you plan to freeze, be sure it is cooled quickly to maintain the safety of the food. You can quick-cool your hot soups or stews by stirring in a bowl or pan that is set down into an ice bath.  Never leave perishable food at room temperature more than two hours; if you do not quick-cool it until cold enough to put in the freezer, put the food in the refrigerator to finish cooling.

Be sure to put your soup in moisture-vapor resistant packaging to prevent freezer burn.  Now what does that mean?  We see it all the time. You want packaging that doesn’t allow for moisture from the food to be drawn out into dry air through it.  And you want packaging materials that keep odors inside the pack. Not all plastics and foils are the same in these characteristics, for example. For soups and stews, rigid containers like freezer quality plastic boxes or jars are a good choice; freezer-weight plastic bags can be used, just a little more awkward to fill and seal with runny food.

To make the most of the convenience factor, package your soup or stew in amounts that you will be able to eat at one time.  Be sure to clearly label each package with the name of the food, and date you put it in the freezer. If you have a variety of foods that will look alike and have short names on that label, consider including some ingredients on that label.  Be sure all sealing areas are clean and dry and to leave recommended headspace for expansion inside the package (https://nchfp.uga.edu/how/freeze/headspace.html). Once packaged and sealed, and place in the coldest part of the freezer.

Quick, it’s time to eat! You can put your soup or stew in a pan for stovetop or bowl for microwave and cook right from the frozen stage. If you heat in your freezer container, make sure it is intended to be used for the hot temperatures the cooked food will reach. Be sure to stir to prevent burning on the stovetop and to evenly distribute heat with either method of cooking. Thawing in the refrigerator is safe, but takes some planning ahead. You can also thaw in the microwave even if you finish cooking on a stovetop or oven.  And reheat your food to at least 165°F everywhere quickly, within 2 hours of starting.  (If I have a broth-based soup that can be brought to a visible boil, I always do that myself to ensure adequate reheating.) If you want to quick-thaw under cold running water, be sure the package is leak-proof and keep running water moving slowly over the package or place it in a clean pan or bowl and submerge under cold tap water that is changed every 30 minutes. Be sure to reheat as above as soon as the food is thawed enough.  To ensure the safety of your food, do not allow these potentially hazardous foods to stay in the temperature danger zone (40°F-140°F) for more than 2 hours at any time.

Planning ahead and freezing that favorite soup, stew or chili is a great way to keep homemade food on your dinner table without all of the stress and hassle of last minute cooking from scratch.

###