Category Archives: Freezing

Bowl with whole raw peaches

Peach Season Has Arrived

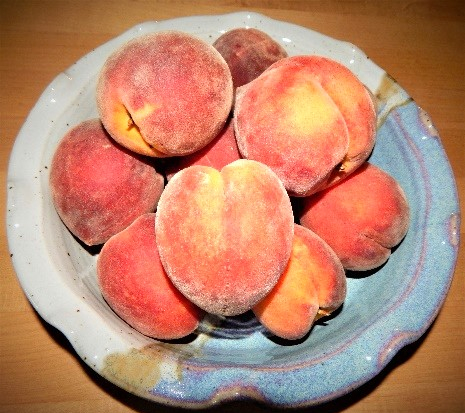
Peach picking time is here!  The first crop of the year is arriving at roadside fruit stands, farm markets, and grocery stores. The weather seems to have cooperated with perfect temperatures, enough rain, and ample sunshine to ensure a winning season. Preserving peaches by canning, freezing, or drying is the best way to extend the use of this popular fruit long after the harvest is over.

Select well-ripened peaches and handle carefully to avoid bruising. Use safe food handling practices before, during, and after preserving the fruit.  Wash hands with soap and water. Wash all surfaces and utensils with soap and hot water, rinse, and air dry.    Wash peaches by gently rubbing under cold running water, drain, and blot dry with paper toweling.  If peaches are not used immediately, refrigerate at 40 degrees F or below until ready to preserve.

Raw peach cut with several slices next to it

To prevent peaches from darkening, peeled and then cut fruit can be placed in ascorbic acid solution.  To peel easily, dip peaches in boiling water for 30 to 60 seconds until skins loosen. Then dip quickly in cold water and slip off skins.


Canning Peaches

Prepare for canning yellow peaches by first reviewing how to use a boiling water canner or pressure canner.  Traditional yellow peach varieties can be processed by both methods in either halves or slices. Yellow peaches can be packed in water, apple juice, or white grape juice for canning or a very light, light or medium sugar syrup.  Hot packs are recommended for best quality.

Canning white-flesh peaches is not recommended. The natural pH of white peaches can exceed 4.6 making them a low-acid food for canning purposes.  Currently there is no low-acid pressure process available for white flesh peaches nor a researched acidification procedure for safe boiling water canning.  Freezing is the recommended method of preserving white-flesh peaches.

Freezing Peaches

Freezing peaches is easy, convenient, and less-time consuming than canning.  Choose a sugar syrup, dry sugar, or unsweetened pack with halved, sliced, crushed, or puréed peaches.  When ready to eat, sliced or halved peaches are best served partially thawed so that textural changes are not as noticeable from the effect of freezing on fruit tissue.

Sweet Peach Spreads and Condiments

Sweet spreads and syrups are a favorite way to preserve peaches.  Jelled or thickened peach products include jellies, jams, preserves, conserves, and marmalades; most are preserved partially by their sugar content.  Other products that are partially preserved by a high sugar content but not jellied include peach butter and peach honey.  USDA recommendations include a reduced sugar peach-pineapple spread that can be made without adding sugar or optionally adding less sugar and canning it for room temperature storage.  (It can also be frozen for storage.)  Reduced sugar or no-sugar-added jam takes purchasing a special commercial pectin modified to gel with a reduced sugar content.

The National Center for Home Food Preservation website has some other offerings for home canned specialties that use peaches, such as peach salsa, chutney, several relishes, and pickled peaches.

Take advantage of the season to preserve some peaches for use throughout the year.

###

Time to Get Blueberries in Your Freezer?

Fresh blueberries laid out in single layer on a tray


Fresh blueberries are in abundant supply in many states now.  Blueberries are easy to freeze and maintain great quality for year-round use in favorites such as muffins, pancakes, and smoothies.  They are nutrient dense and add freshness and flavor to meals.

Blueberries can be prepared for freezing using two methods.  Dry pack and crushed or puŕeed. If you can’t freeze right after picking, refrigerate at 40 degrees F or below until ready to prepare and freeze. Work with small batches to prevent loss of nutrients and quality.

Dry pack is the easiest method.  Most advice says do not wash the blueberries; the skins will toughen if frozen wet. (If you do want to rinse them off with clean water, be sure to completely dry again before packaging and freezing.) Remove leaves, stems, and any bruised or immature berries. Package berries into moisture vapor resistant packaging, either rigid plastic or flexible bags.  Leave headspace.

Tray freezing before dry packaging allows blueberries to remain loose; and easier to remove in smaller amounts.  Spread a single layer of berries on shallow trays and freeze.  Once frozen, remove and promptly package.  Return to the freezer immediately.  When ready to use, remove from packaging and wash blueberries thoroughly by gently rubbing under cold running water.

Crushed or puréed is another method for freezing blueberries.  To prepare for freezing, remove leaves, stems, and any bruised or immature berries.  Wash blueberries thoroughly by gently rubbing under cold running water. Drain in a colander and blot dry with paper towels.

Crush, press through a fine sieve, or process in a food processor or blender. Mix with 1 to 1-1/8 cups sugar with each quart (2 pounds) of crushed berries or purée.  Stir until sugar is dissolved.  Package in freezer containers, leaving headspace.  Label, seal, and freeze promptly.   Keep an accurate inventory of the freezer.  Use first in, first out method to use blueberries at peak quality.

If you plan on using your frozen berries at a later time to make jam or jelly, freeze them unsweetened or follow the proportions of sugar to berries in the jam recipe you will eventually use.

Taking time to freeze fresh blueberries with care will provide delicious, high quality, and nutritious fruit for use year-round.

(The links on this page can be found at https://nchfp.uga.edu)

###

Get Ready Now for the Summer Harvest

seeds_ela

If you are thinking about joining the trend in our communities to preserve food this summer, start planning and preparing now! Start by checking your equipment and supplies. Proper equipment in good condition is required for safe, high quality home canned food, for example.

If you’ve not yet purchased your needed equipment, there are two types of canners to consider: boiling water canners and pressure canners. A boiling water canner is used for canning acid or acidified foods like most fruits, most pickles, jams and jellies. Boiling water canners cost about $30-$100, or can be assembled yourself with a large stock pot, secure lid, and rack to keep jars off the bottom of the pot.

A pressure canner is essential for canning low acid foods such as vegetables, meats, fish, and poultry. Temperatures inside pressure canners reach higher than boiling water canners (for example, 240°F and above as compared to about 212°F). This is necessary to follow the tested processes available to be sure and kill the toxin–producing spores of the bacteria Clostridium botulinum.  If not killed, these spores can grow out and produce a deadly toxin (poison) in room-temperature stored jars of the low-acid foods mentioned.

You have two choices for your type of pressure canner: a dial gauge canner or a weighted gauge canner. Most steps in managing the pressure canning process are the same, but the two styles have different types of gauges to indicate the pressure inside the canner. Expect to spend $100-$150 or more on a pressure canner.  USDA and National Center for Home Food Preservation processes have only been developed in traditional stovetop pressure canners managed as in Using Pressure Canners on our website.

If you use a dial gauge canner, then it’s important to have the gauge tested for accuracy before each canner season or if you drop or damage your gauge. It isn’t as easy as it used to be to get gauges tested. Try a local hardware store or your local Cooperative Extension agent, even though not all still provide this service. For either type of canner, check that the rubber gasket is flexible and soft, and if it is brittle, sticky, or cracked then replace it with a new gasket. Also check that any openings, like vent ports, are completely clean and open.

You’ll also need jars, lids, and ring bands manufactured for home canning. When getting started, new jars are a worthwhile investment (versus purchasing used jars from a yard sale or flea market) because very old jars may break under pressure and heat. Mason-type jars of standard sizes (e.g., half-pint, pint, and quart) are recommended for the tested processes available from science-based sources such as USDA and your land-grant university. Make sure those jars are manufactured and sold for canning purposes; not all glass and Mason-style jars are tempered to prevent breakage with the extreme heat and temperature swings during canning. When you actually get to canning your harvest, be sure to follow manufacturers’ advice for preparing your jars and lids. In addition to standard cooking utensils like cutting boards and bowls, a jar funnel, jar lifter, headspace measurement tool, and bubble-freer are items that you will want to have handy for canning.

If you are freezing your harvest, be sure to use packaging such as plastic bags or rigid containers that are intended for freezer storage of foods.  Not all plastics are the same, and you want materials that will hold up to freezer temperatures as well as protect your goodies from damaging air and mixtures of odors.

Growing your own? You may be lucky enough to have previously started keeping garden records so you remember the name of that great tomato or pepper variety you have liked this past year. If not, think about planning to keep records this year. A garden journal might include variety, seed source, date planted, date harvested, notes on how it grew and resisted disease, and your personal evaluation of the crop.

A final must is reliable, up-to-date canning and other food preservation instructsetp5ions. Specific kitchen equipment or ingredients could be needed to follow directions as they are written for food preservation. Look ahead to what you plan on canning so you can obtain or organize the equipment and tools needed before your garden produce is ready to use. And in the case of canning especially, very significant food safety risks are possible by following unsound recommendations. Reliable, up-to-date canning instructions are available at the NCHFP website, or in the USDA Complete Guide to Home Canning, So Easy to Preserve, or the county or local area Extension office in your state.

———–


Preserving Those Unripe Tomatoes

Some of us have planned purposes for green, unripe tomatoes early in the season – like my mother’s delish green tomato relish recipe! – while others are grabbing end of season unripe tomatoes off the vines before the frost hits. Now you have a lot of these green tomatoes, what to do with them? greentom_blog

Unripe tomatoes may be canned like ripe tomatoes, following the same directions including acidification. Even though unripe tomatoes should have a lower pH (higher acid content) than their ripe counterparts, we do not know if even in the unripe stage your variety and growing situation may mean they are still above pH 4.6. So follow the USDA directions for canning tomato and tomato products, including the acidification. See the acidification advice even for green tomatoes here: https://nchfp.uga.edu/how/can_03/tomato_intro.html and the available canning procedures for tomatoes here: https://nchfp.uga.edu/how/can3_tomato.html

How about that prized relish in our family?  That and other relishes calling for green tomatoes include

And, even though it doesn’t call for green, unripe tomatoes, I might throw in the more unusual, very tasty Oscar Relish to help use up those red tomatoes being grabbed off vines before the frost, also: https://nchfp.uga.edu/how/can_06/oscar_relish.html .

Green-Tomato-Pie-049-photoshopped
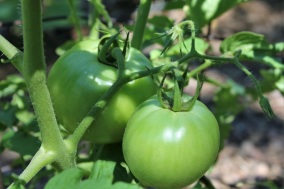
Another option for something a bit different (and not a relish), is the Green Tomato Pie Filling: https://nchfp.uga.edu/how/can_02/can_pie/green_tomato_filling.html This will give you a great headstart for something to have handy during winter holidays (or really anytime).

Image courtesy of Randal Oulton

Some look forward to the summer treat of fried green tomato slices; you can freeze your raw slices and have them for frying later in the year, also:

Freezing green tomato slices: https://nchfp.uga.edu/how/freeze/tomato_green.html

For more information on canning and freezing methods, including packaging choices and headspace for freezer containers, see general sections on these topics available from the National Center for Home Food Preservation at the University of Georgia, https://nchfp.uga.edu.

###