Tag Archives: boiling water canning

What is a vegetable, a crayon color, an entire genus, and a type of pickle?

asparagus tipsAsparagus!

Commercial production of the popular vegetable Asparagus officinalis harvests primarily from January to June, but its growing season across the U.S. is likely to begin closer to mid-April and last 6 to 8 weeks. Asparagus is unique in that you have to wait about 3 years from seed planting until first harvest, so make sure you do your research before growing it for the first time. Once you do get your hands on some fresh spears, one way or another, here’s a delicious way to make them last all year:
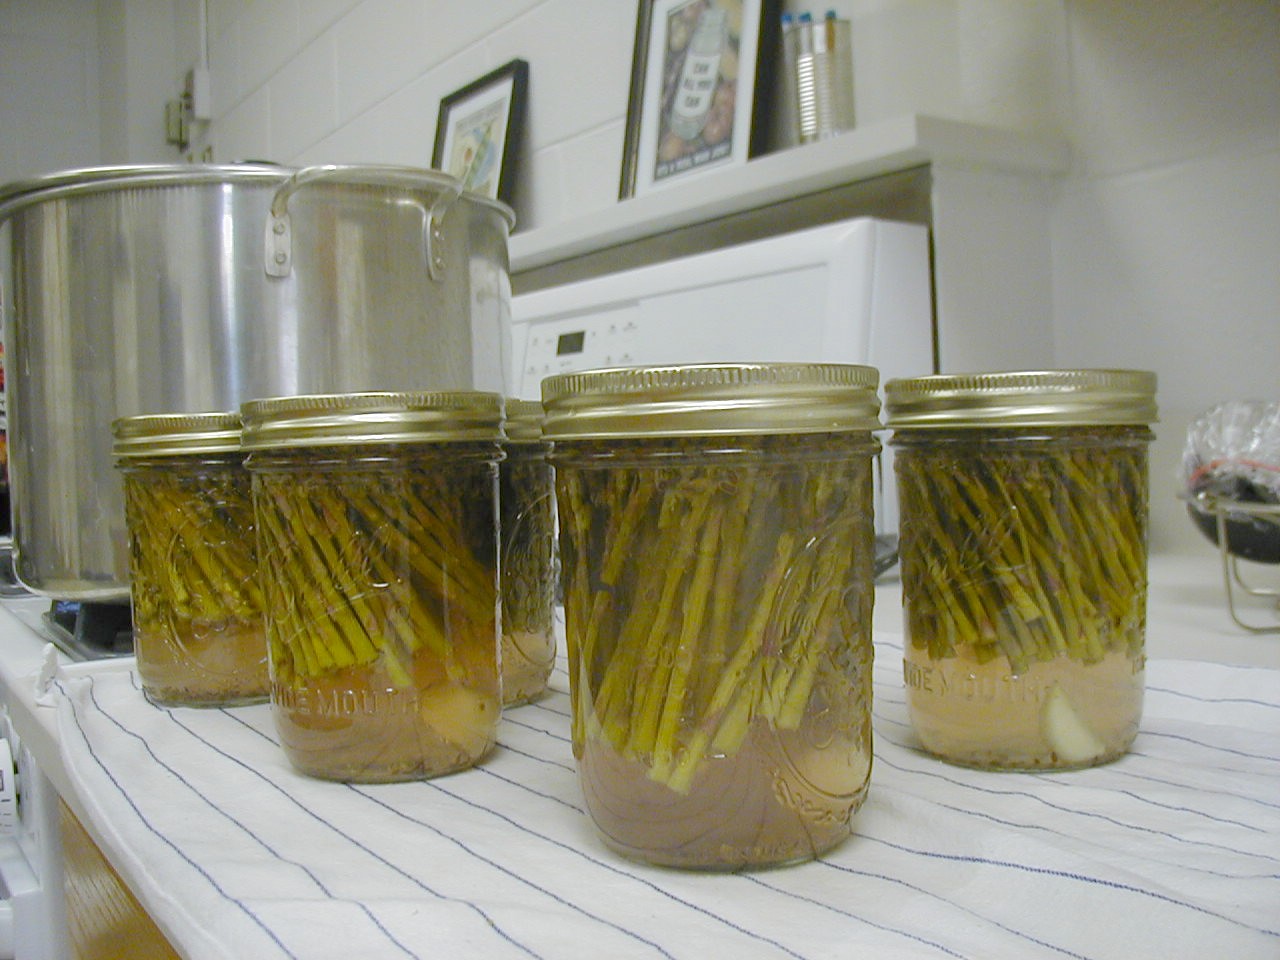
Pickled Asparagus

For six wide-mouth pint jarswashed asparagus

10 pounds asparagus

6 large garlic cloves

4½ cups watercutting asparagus

4½ cups white distilled vinegar (5%)

6 small hot peppers (optional)

½ cup canning salt

3 teaspoons dill seed

  1. Wash and rinse canning jars; keep hot until ready to use. Prepare lids according to manufacturer’s directions.
  2. Wash asparagus well, but gently, under running water. Cut stems from the bottom to leave spears with tips that fit into the canning jar with a little less than ½-inch headspace. Peel and wash garlic cloves. Place a garlic clove at the bottom of each jar, and tightly pack asparagus into jars with the blunt ends down.
  3. In an 8-quart Dutch oven or saucepot, combine water, vinegar, hot peppers (optional), salt and dill seed. Bring to a boil. Place one hot pepper (if used) in each jar over asparagus spears. Pour boiling hot pickling brine over spears, leaving ½-inch headspace.
  4. Remove air bubbles and adjust headspace if needed. Wipe rims of jars with a dampened, clean paper towel; apply two-piece metal canning lids.
  5. Process in a boiling water canner according to the recommendations in the table below. Let cool, undisturbed, for 12 to 24 hours and check for seals.

Pickled AsparagusAllow pickled asparagus to sit in processed jars for 3 to 5 days before consumption for best flavor development.

Recommended process time for Pickled Asparagus in a boiling-water canner.

Process Time at Altitudes of

Style of Pack

Jar Size

0 – 1,000 ft

1,001 – 6,000 ft

Above 6,000 ft

Raw

12-ounce or Pints

10 min

15

20

Visit the NCHFP website for recipe quantities to make seven 12-ounce jars and links to more information about Using Boiling Water Canners and Principles of Home Canning.

Recipe developed at The University of Georgia, Athens, for the National Center for Home Food Preservation. Released by Elizabeth L. Andress, Ph.D., Department of Foods and Nutrition, College of Family and Consumer Sciences. October 2003.

Why Can’t I Just Guess at a Process Time for Canning?

Mold on JamIf you guess at a process time for canning, you run the risk of underprocessing your food, which could lead to food poisoning and/or product loss due to spoilage.

All reliable recommendations for canning include process times that have been determined by or based on results of laboratory testing. The exact time and temperature combinations of tested canning processes are needed to assure the destruction of microorganisms that may be present in the filled jars. Sure, it’s possible that you could use unsafe canning practices for some time without causing waste or harm, but it only takes one batch of food with destructive microorganisms in it to ruin your streak of luck. And especially if you are canning low acid foods, the consequences could be severe and irreversible.

While some microorganisms are apparent just by looking (think molds growing on the surface of jelly), others remain invisible to your bare eyes (think pathogenic bacteria which cause food poisoning). Many different types of mold, yeast, and bacteria dwell on food. Given their preferred conditions of moisture, acidity, oxygen levels, and temperature they will grow, and some will even product toxin.

Fortunately, all microorganisms can be destroyed by breaking their threshold for heat. The process times provided in each of our home canning recommendations have been found to deliver enough heat to destroy microorganisms of concern in that particular food. Characteristics such as consistency, pH level (acidity), size of food pieces, presence of protective nutrients, size and shape of jars, and solid to liquid ratio all influence the ability of heat to move through and thoroughly penetrate the entire contents of a filled jar. You can trust that your home-canned foods will receive adequate heat treatment by using proper canning methods and following recommended process times.

Why does each recipe have a process time table with multiple times or amounts of pressure? (See Crushed Tomatoes for a good example.) Because atmospheric pressure decreases as altitude increases, causing water to boil at lower temperatures as altitude increases. In order to achieve the same overall heat treatment as at sea level, more time is needed in a boiling water canner at higher elevations (since the temperature of the water distributing the heat is less). Pressure canning relies on temperatures inside the canner building even higher than that of boiling. So, likewise, more pressure needs to be applied to a pressure canner at higher elevations so that the temperature inside can reach higher.

If you’d like to learn more about how process times are determined for home-canned foods, please read ‘Backgrounder: Heat Processing of Home-canned Foods’ by Elaine M. D’Sa.

Melt-in-your-Mouth Lemon Curd

lcurdbowl6

Although not meant to be a part of your everyday diet (you’ll see why when you consider the ingredients list), lemon curd sure is a special treat! A traditional English sweet spread, curds work well as a topping on cakes, cookies, and scones or as filling in pies and tarts. You could spoon it onto cream cheese for a unique dip or simply drip it over ice cream or frozen yogurt.

Making lemon curd is somewhat challenging, so if you are a novice then you might want to recruit help from a more experienced cook. And, as usual, if you are new to canning then please read step-by-step instructions on Using Boiling Water Canners and Principles of Home Canning.

frozen l curd

You can prepare this lemon curd to be consumed fresh, frozen, or canned. You could even make Lime Curd instead, substituting the lemon juice and zest for equal parts lime juice and zest. Either way, fresh curd needs to be refrigerated and eaten within 4 weeks, frozen curd will maintain best quality for up to a year, and canned curd for just 3 to 4 months.

The procedure for making lemon curd is an exacting process. Low-acid foods make up a significant portion of the ingredients (butter and eggs), so it is especially important to follow a tested recipe and canning process time for safety’s sake. Instead of detailing each step of the procedure here, please review the ingredient and equipment lists below, and then use these links for complete instructions from the National Center for Home Food Preservation: Canned Lemon Curd and Preparing and Preserving Lemon Curd (frozen).

l curd ingredientsl curd whisking

Lemon Curd, canned or frozen

Ingredients:

2½ cups superfine sugar (or grind granulated sugar in a food processor for one minute)

½ cup lemon zest (optional)

1 cup commercially bottled standard lemon juice (needs to be bottled for consistent pH)

¾ cup unsalted butter, chilled and cut into approximately ¾-inch pieces

7 large egg yolks

4 large whole eggs

Equipment needed:

lemon zester

small mixing bowl

balloon whisk

1½ quart double boiler

mesh strainer

kitchen thermometer measuring at least up to 180°F

silicone spatula or cooking spoon

dish cloth or towel

medium-sized glass or stainless steel mixing bowl

1 quart-sized or 2 pint-sized freezer containers and plastic food wrap (only if freezing)

3 to 4 half-pint canning jars, lids, and ring bands and a boiling water canner (only if canning)

This entry was inspired by the season, the Valentine’s Day holiday (because lemon curd makes an impressive gift whether fresh or preserved) and by the article Preserving and Preparing Lemon Curd by Elaine M. D’Sa.

Brighten Up your Days with Marmalades

Cold temperatures and gray skies may be begging you for uplifting treats this winter. When you’re not up for braving the conditions outside, why not get busy in the warmth of your own kitchen? Making marmalades is not only fun to do, but there will also be plenty of delicious cheer to share with neighbors and visitors!

Most of these recipes do not require any additional pectin, as there is enough natural pectin in the ingredients. Pectin is a fiber found in the cell walls of many fruits and vegetables, though its content varies widely. Pectin is water-soluble, enabling it to form a gel-like compound that characterizes jellied products when combined with certain proportions of water, acid and sugar. In general, citrus fruits contain the most pectin, although apples, peaches, berries, and a few other fruits also contain a lot of pectin in their skins. Specifically, the most pectin is found in the white membrane located just under the skin of citrus fruits.

Oranges

For a super citrusy taste experience with grapefruit, orange, and lemon, try Citrus Marmalade.

If you still have apples from your harvest or can find a high-quality, tart variety at a grocery store, then you might like Apple Marmalade.

Pull out your frozen peach slices or look for peaches in the fresh or frozen sections of the grocery store to make this Peach-Orange Marmalade.

Warm spices (cinnamon, clove, and allspice) make Tomato Marmalade a unique seasonal specialty.

Cranberry Marmalade is a holiday favorite; just make sure you have a box of powdered pectin on hand.

jar of preserves