Tag Archives: canning in winter

Cranberry Conserve

cranberries in (and out of) bowl

Since you can still find fresh cranberries at some stores, here’s a Cranberry Conserve recipe from So Easy to Preserve that makes a more hearty treat out of a classic wintertime favorite. Make and enjoy- before it’s too late!

Cranberry Conserve

  • 1 unpeeled, finely chopped orange
  • 1 cup water
  • 3 cups sugar
  • 1 quart cranberries, washed
  • ½ cup seedless raisins
  • ½ cup chopped nuts (walnuts or pecans make a tasty choice)

Yield: About 4 half-pint jars

Please read Using Boiling Water Canners before beginning. If this is your first time canning, it is recommended that you read Principles of Home Canning.

Procedure: Combine orange and water; cook rapidly until peel is tender (about 20 minutes). Add cranberries, sugar and raisins. Bring slowly to boiling, stirring occasionally until sugar dissolves. Cook rapidly, almost to the jellying point of 220°F (about 8 minutes). As mixture thickens, stir frequently to prevent sticking. Add nuts during the last 5 minutes of cooking. Pour hot conserve into hot jars, leaving ¼-inch headspace. Wipe rims of jars with a dampened clean paper towel; apply two-piece metal canning lids. Process in a Boiling Water Canner.

Table 1. Recommended process time for Cranberry Conserve in a boiling water canner.
Process Time at Altitudes of
Style of Pack Jar Size 0 – 1,000 ft 1,001 – 6,000 ft Above 6,000 ft
Hot Half-pints 10 min 15 20

more cranberries

A sweet spread for your sweetheart

Jelly jars

The spring and summer months allow a wealth of fresh canning possibilities. Tomatoes, corn and green beans from gardens can keep you canning or freezing until you wear out. But by winter, you may be ready to try some different types of preserves. Perhaps you’re also looking for ways to sweeten the upcoming Valentine’s Day holiday with home-preserved gifts for your loved ones.

Elizabeth Andress is the Director of the National Center for Home Food Preservation, which is hosted by the College of Family and Consumer Sciences at the University of Georgia. She said recipes available from the Center using juice concentrates and canned vegetables enable canners to preserve in winter. “There are recipes perfect for people yearning to can in the winter,” Andress said. “You don’t always have to can with fresh fruits and vegetables. Some of those preserves also make nice holiday gifts.”

Orange Jelly from Frozen Juice

This recipe calls for frozen concentrated juice and powdered pectin and creates a delightful, flavorful orange jelly for toast or biscuits on dreary winter mornings or late afternoons.

For five or six half-pint jars, you’ll need:

  • 12 ounces concentrated orange juice, thawed
  • 2½ cups water
  • 4½ cups sugar
  • 1 box powdered regular pectin

Begin by sterilizing your canning jars. To sterilize jars, boil empty, washed and rinsed jars for 10 minutes in water. The easiest way to do this is to stand empty jars upright on a rack in a boiling water canner filled with clean water. Keep jars hot until they are filled.

Measure sugar and set aside. Mix juice and water in a saucepan and stir in powdered pectin. Bring to a full boil over high heat, stirring constantly. Once boiling, stir in all sugar. Stir and bring to a full boil that cannot be stirred down. Boil hard for one minute, stirring constantly.

Skimming foam (1)

Remove from heat; skim off foam quickly. Pour hot jelly immediately into hot, sterile jars, leaving ¼-inch headspace. Wipe rims of jars with a dampened clean paper towel; adjust two-piece metal canning lids. Process in a boiling water canner for 5 minutes (10 minutes if 1,000-6,000 ft. altitude; 15 minutes if over 6,000 ft.). Allow jelly to cool, undisturbed, for 12 to 24 hours and check seals. You can remove screw bands after the food has cooled if the lids are sealed.

This entry is an edited version of an article originally written by April Reese Sorrow and Elizabeth L. Andress.

If you haven’t stored your pressure canner for the season…

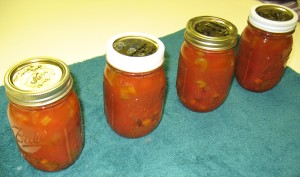
Cans of Tomato Veggie Soup

…then it’s a great time to can soups! (And of course, even if you thought you were done for the season and have put it nicely away in storage, then you can still pull it back out.)

To warm up these wintry days, prepare and preserve your favorite mix of vegetables, beans or peas, meat, poultry or seafood into a hearty soup. In order to produce a safe preserved product with these low-acid foods, you’ll need to use a pressure canner. You’ll also want to follow these recommendations from USDA:

If this is your first time canning or you admit that you could benefit from a refresher of the basics, please first read Using Pressure Canners and Principles of Home Canning.

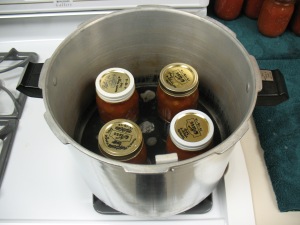
Jars of soup in pressure canner

It is important that you DO NOT add noodles or other pasta, rice, flour, cream, milk, or other thickening agents to your home canned soup. These ingredients effect the heat penetration of the jars during processing and USDA does not offer recommendations for their use. Also, if you do choose to use dried beans or peas, you MUST fully rehydrate them first so as not to alter the measurement of water in the final products.

The procedure is fairly simple: select, wash, and prepare vegetables, meat, and/or seafood as you would for a hot pack. For more information about preparing for hot packs, refer to So Easy to Preserve or the National Center for Home Food Preservation website. If you are including meat, then cover meat with water and cook until tender. Cool the meat and remove any bones. If you are using dried beans or peas, then add 3 cups water for each 1 cup of beans or peas, boil 2 minutes, and then remove from heat. Soak for 1 hour, then again heat to a boil, and drain.

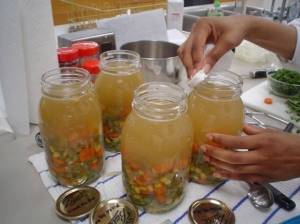
Soup filled jars half and half

In a large stock pot, combine solid ingredients with enough broth, tomato juice, or water to cover them. Boil 5 minutes. Add salt (or other dried spices) to taste, if you like. Fill jars halfway with solid mixture, and then add the remaining liquid, leaving 1-inch headspace. Adjust lids and process using the tables below.

Original sources for this entry come from the National Center for Home Food Preservation website and So Easy to Preserve .

Recommended process time for Soups in a dial-gauge pressure canner.

Canner   Pressure (PSI) at Altitudes

Style   of Pack

Jar   Size

Process   Time

0-2,000ft

2,001-4,000ft

4,001-6,000ft

6,001-8,000ft

Hot

Pints

60* min

11   lb

12 lb

13 lb

14 lb

Quarts

75* min

11   lb

12 lb

13 lb

14 lb

* Caution: Process 100 minutes if soup contains seafoods.
Recommended process time for Soups in a weighted-gauge pressure canner

Canner   Pressure (PSI) at Altitudes

Style   of Pack

Jar   Size

Process   Time

0-1,000ft

Above   1,000ft

Hot

Pints

60* min

10   lb

15 lb

Quarts

75* min

10   lb

15 lb

* Caution: Process 100 minutes if soup contains seafoods.

Putting up what you put up with

Cozy Canner

If you happen to be a home food preserver who tucks away your canning equipment snugly and soundly through the winter season, then you might like to know some tips for giving tender loving care to your equipment as you store it. (Note: it doesn’t really require warm gloves.)

To encourage safe operation of your pressure canner in the coming spring and summertime, clean the vent and safety valve. To do this, pull a clean string or narrow strip of cloth through the opening of the vent. Make sure the safety valve is free of debris and moves smoothly, and then remove it for cleaning (or follow manufacturer’s directions). Next, check the gasket, if your canner has one (some are metal to metal instead). The gasket is the rubber or rubber-like ring that helps seal the rim with the lid. Follow manufacturer’s instructions to remove the gasket for cleaning, and if it needs replacing then you should easily find a new one from the manufacturer or at a hardware store. Once again, follow your particular manufacturer’s directions for how to care for the sealing edges of your canner. If you have a dial gauge canner, be sure not to immerse the gauge in water.

Presto Pressure Canner

If you have an aluminum canner and the inner surface is darkened, clean it by filling it above the darkened line with a mixture of 1 tablespoon cream of tartar to each quart of water. Heat the water to a boil and boil, covered, until the dark deposits disappear. Stubborn deposits may require additional cream of tartar. Once deposits are gone, empty the canner, wash it with hot soapy water, rinse, and dry. A hint for reducing the occurrence of these deposits next canning season: add 1 tablespoon of white vinegar to the water in the canner while you process jars.

To absorb moisture and odors, store the canner with clean paper towels in the bottom and around the rack. Rest the lid on the canner upside-down, so that it does not seal and trap moisture. Designate a clean, dry storage area and use boxes, racks, or other organizational accessories to create a food preservation storage center to which you can also add other cleaned equipment and utensils.

Jars, bands, and more

Inventory your jars, checking for chips and breaks. Wash and dry jars and remove any ring bands that may be screwed onto the jars. Wash and dry the ring bands as well, checking for dents and rust. If cared for properly, jars have the potential to last indefinitely, and bands can be used over and over until they rust or get bent. Remember though that flat lids are to be processed in a canner only one time, then discarded (or used creatively for non-canning purposes) after that jar of food is consumed.

Remember too, if you have a dial gauge pressure canner, to mark your calendar now for a time to have your gauge tested in the early spring. Contact your County Extension Agent for information about checking its accuracy. In case it is off by more than 1 pound of pressure, allow enough time to replace the gauge by checking it well in advance of your canning season.

For original source of this information, go to When It’s
Time to Store Canning Supplies…
on the National Center for Home Food Preservation website.