Going Wild with Cherries

Raw, Washed CherriesQuick! Cherries’ peak growing season is so short, you don’t want to miss making the most of any fresh ones you can get a hold of. If you buy cherries from a typical grocery store, you are likely to find the best deals of the year during the early summer months of June and July.

cropped cherry jarsThere are so many ways to preserve cherries that instead of describing each method here, you’ll find complete recommendations on the National Center for Home Food Preservation website by clicking the blue links, below.

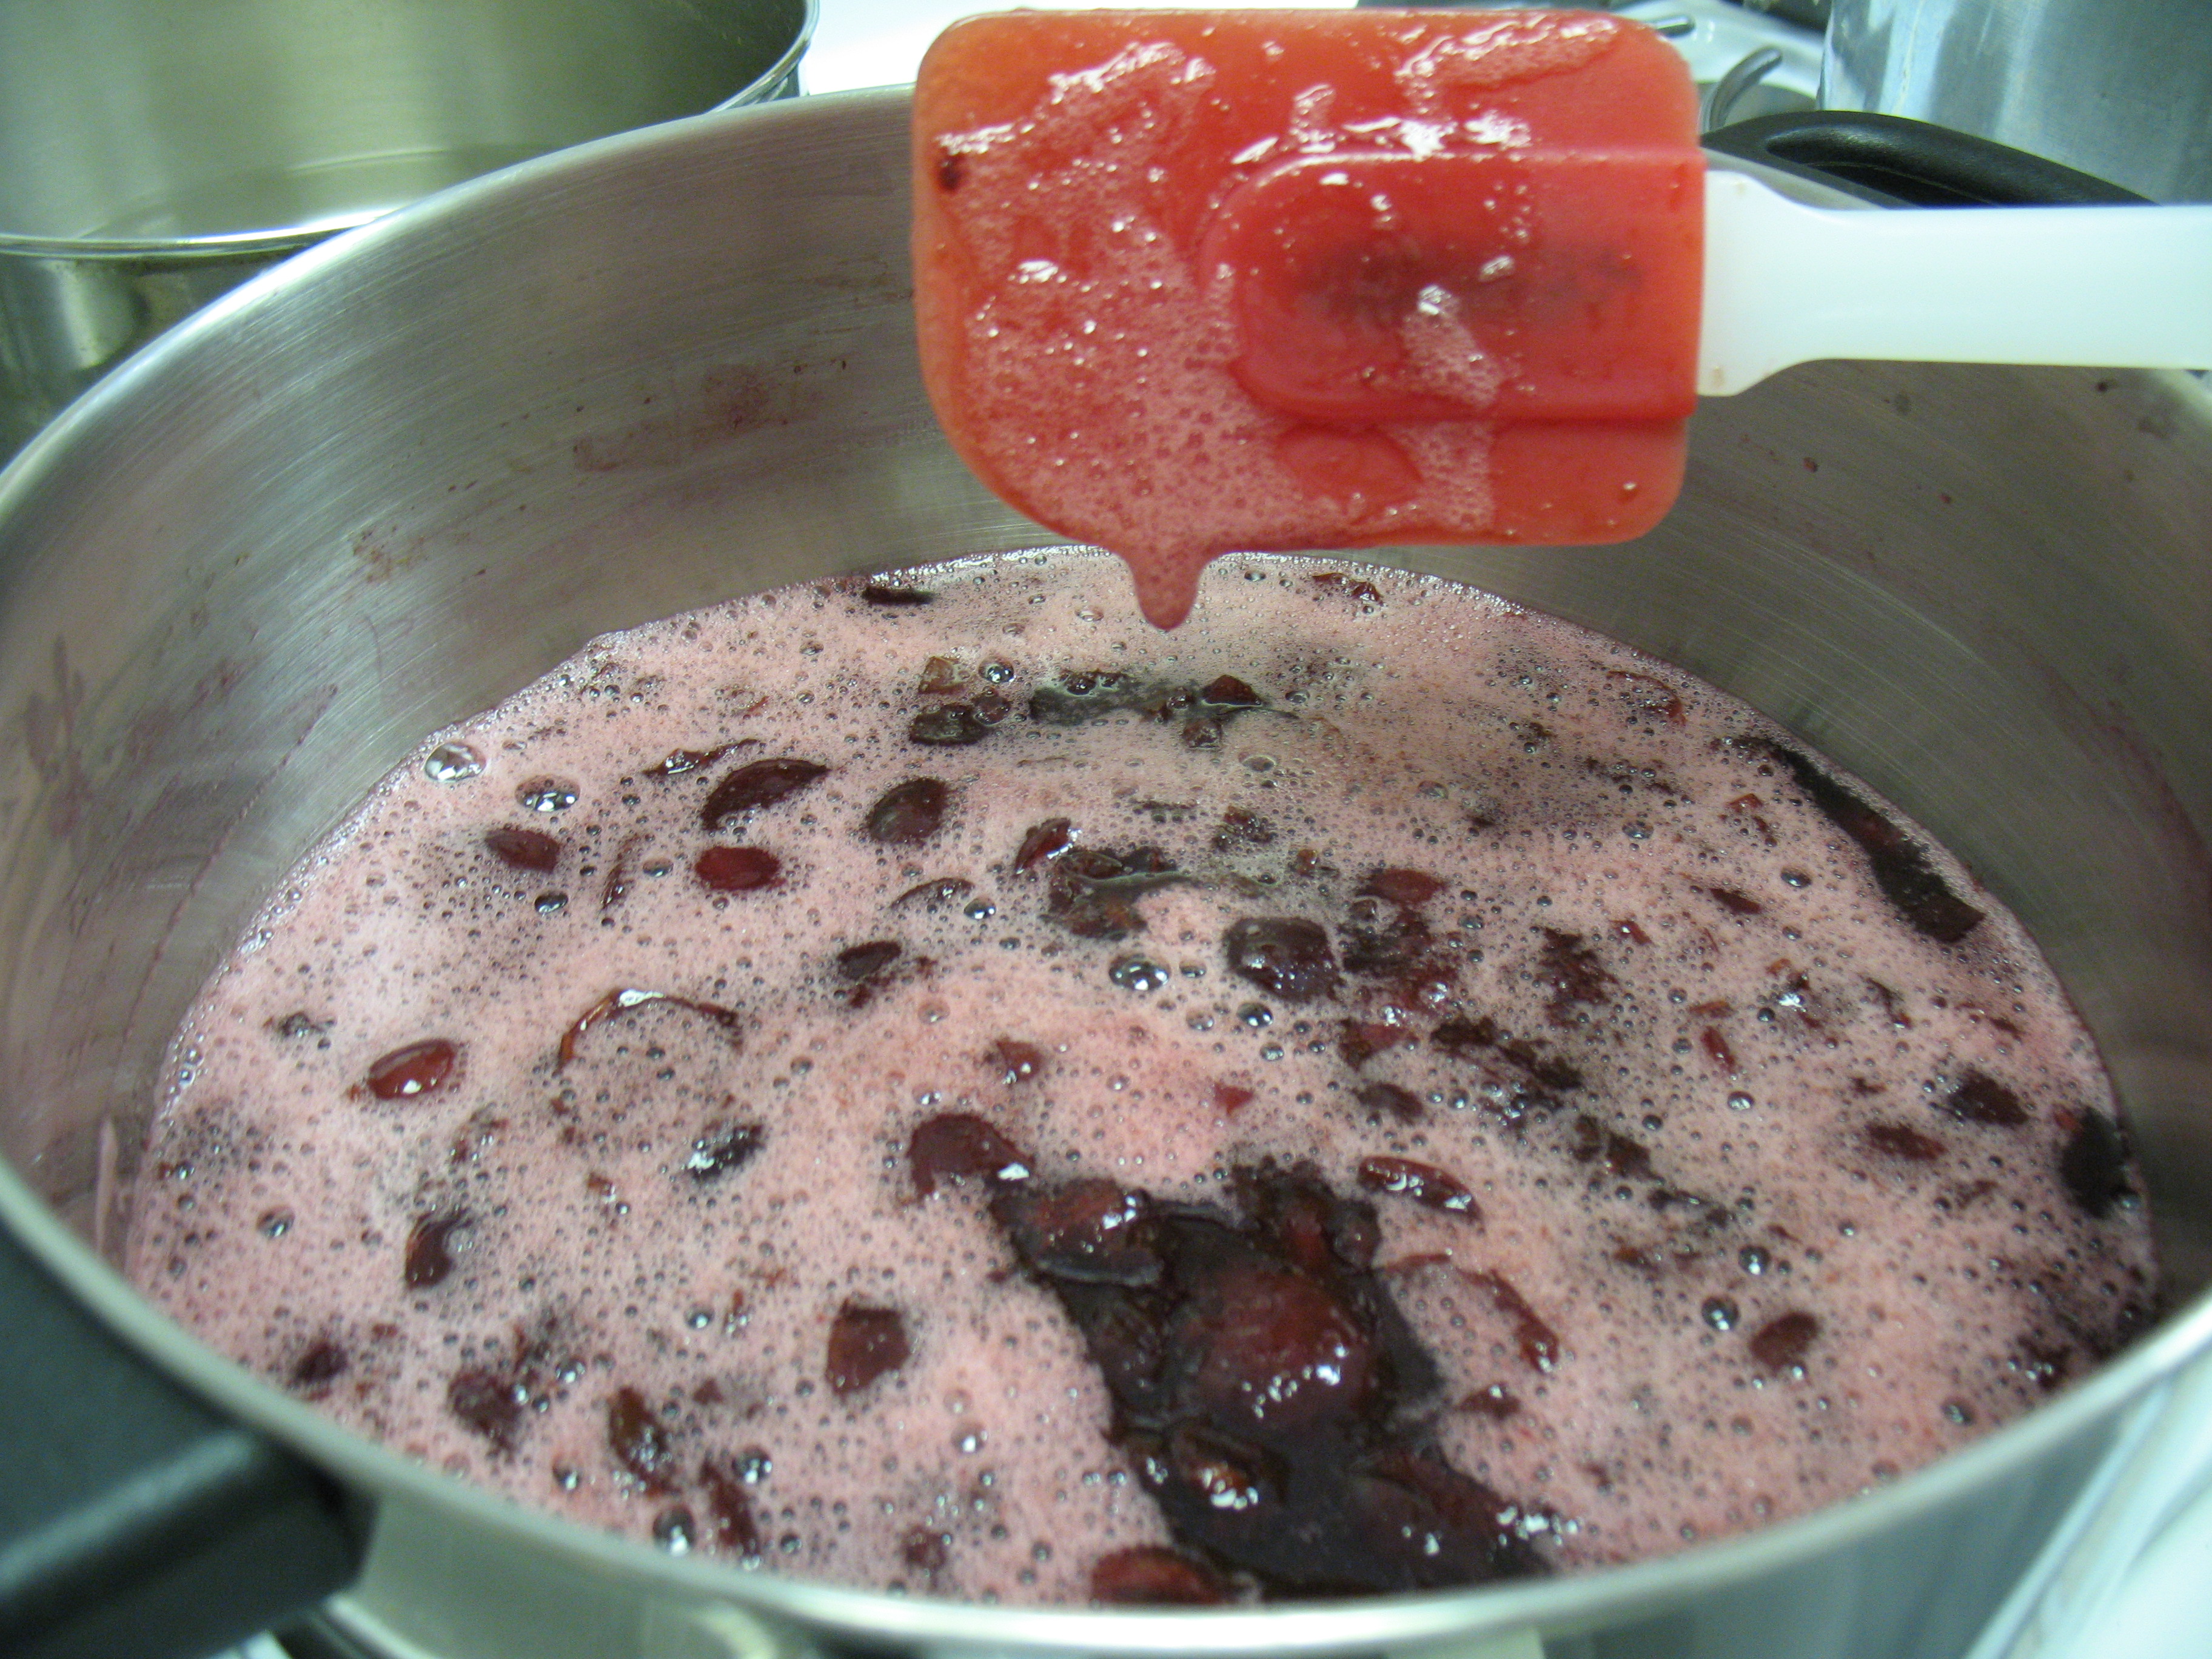
With about 3 pounds (2 quarts) of sour cherries, try making Cherry Jam with powdered pectin or the equally scrumptious Cherry Jam with liquid pectin.  Goes great on biscuits, thumb-print cookies, or mixed into plain yogurt.

If you have a bit more time available, then you’ll be able to prepare the juice needed for making Cherry Jelly with powdered pectin or Cherry Jelly with liquid pectin.

Pitting Cherries
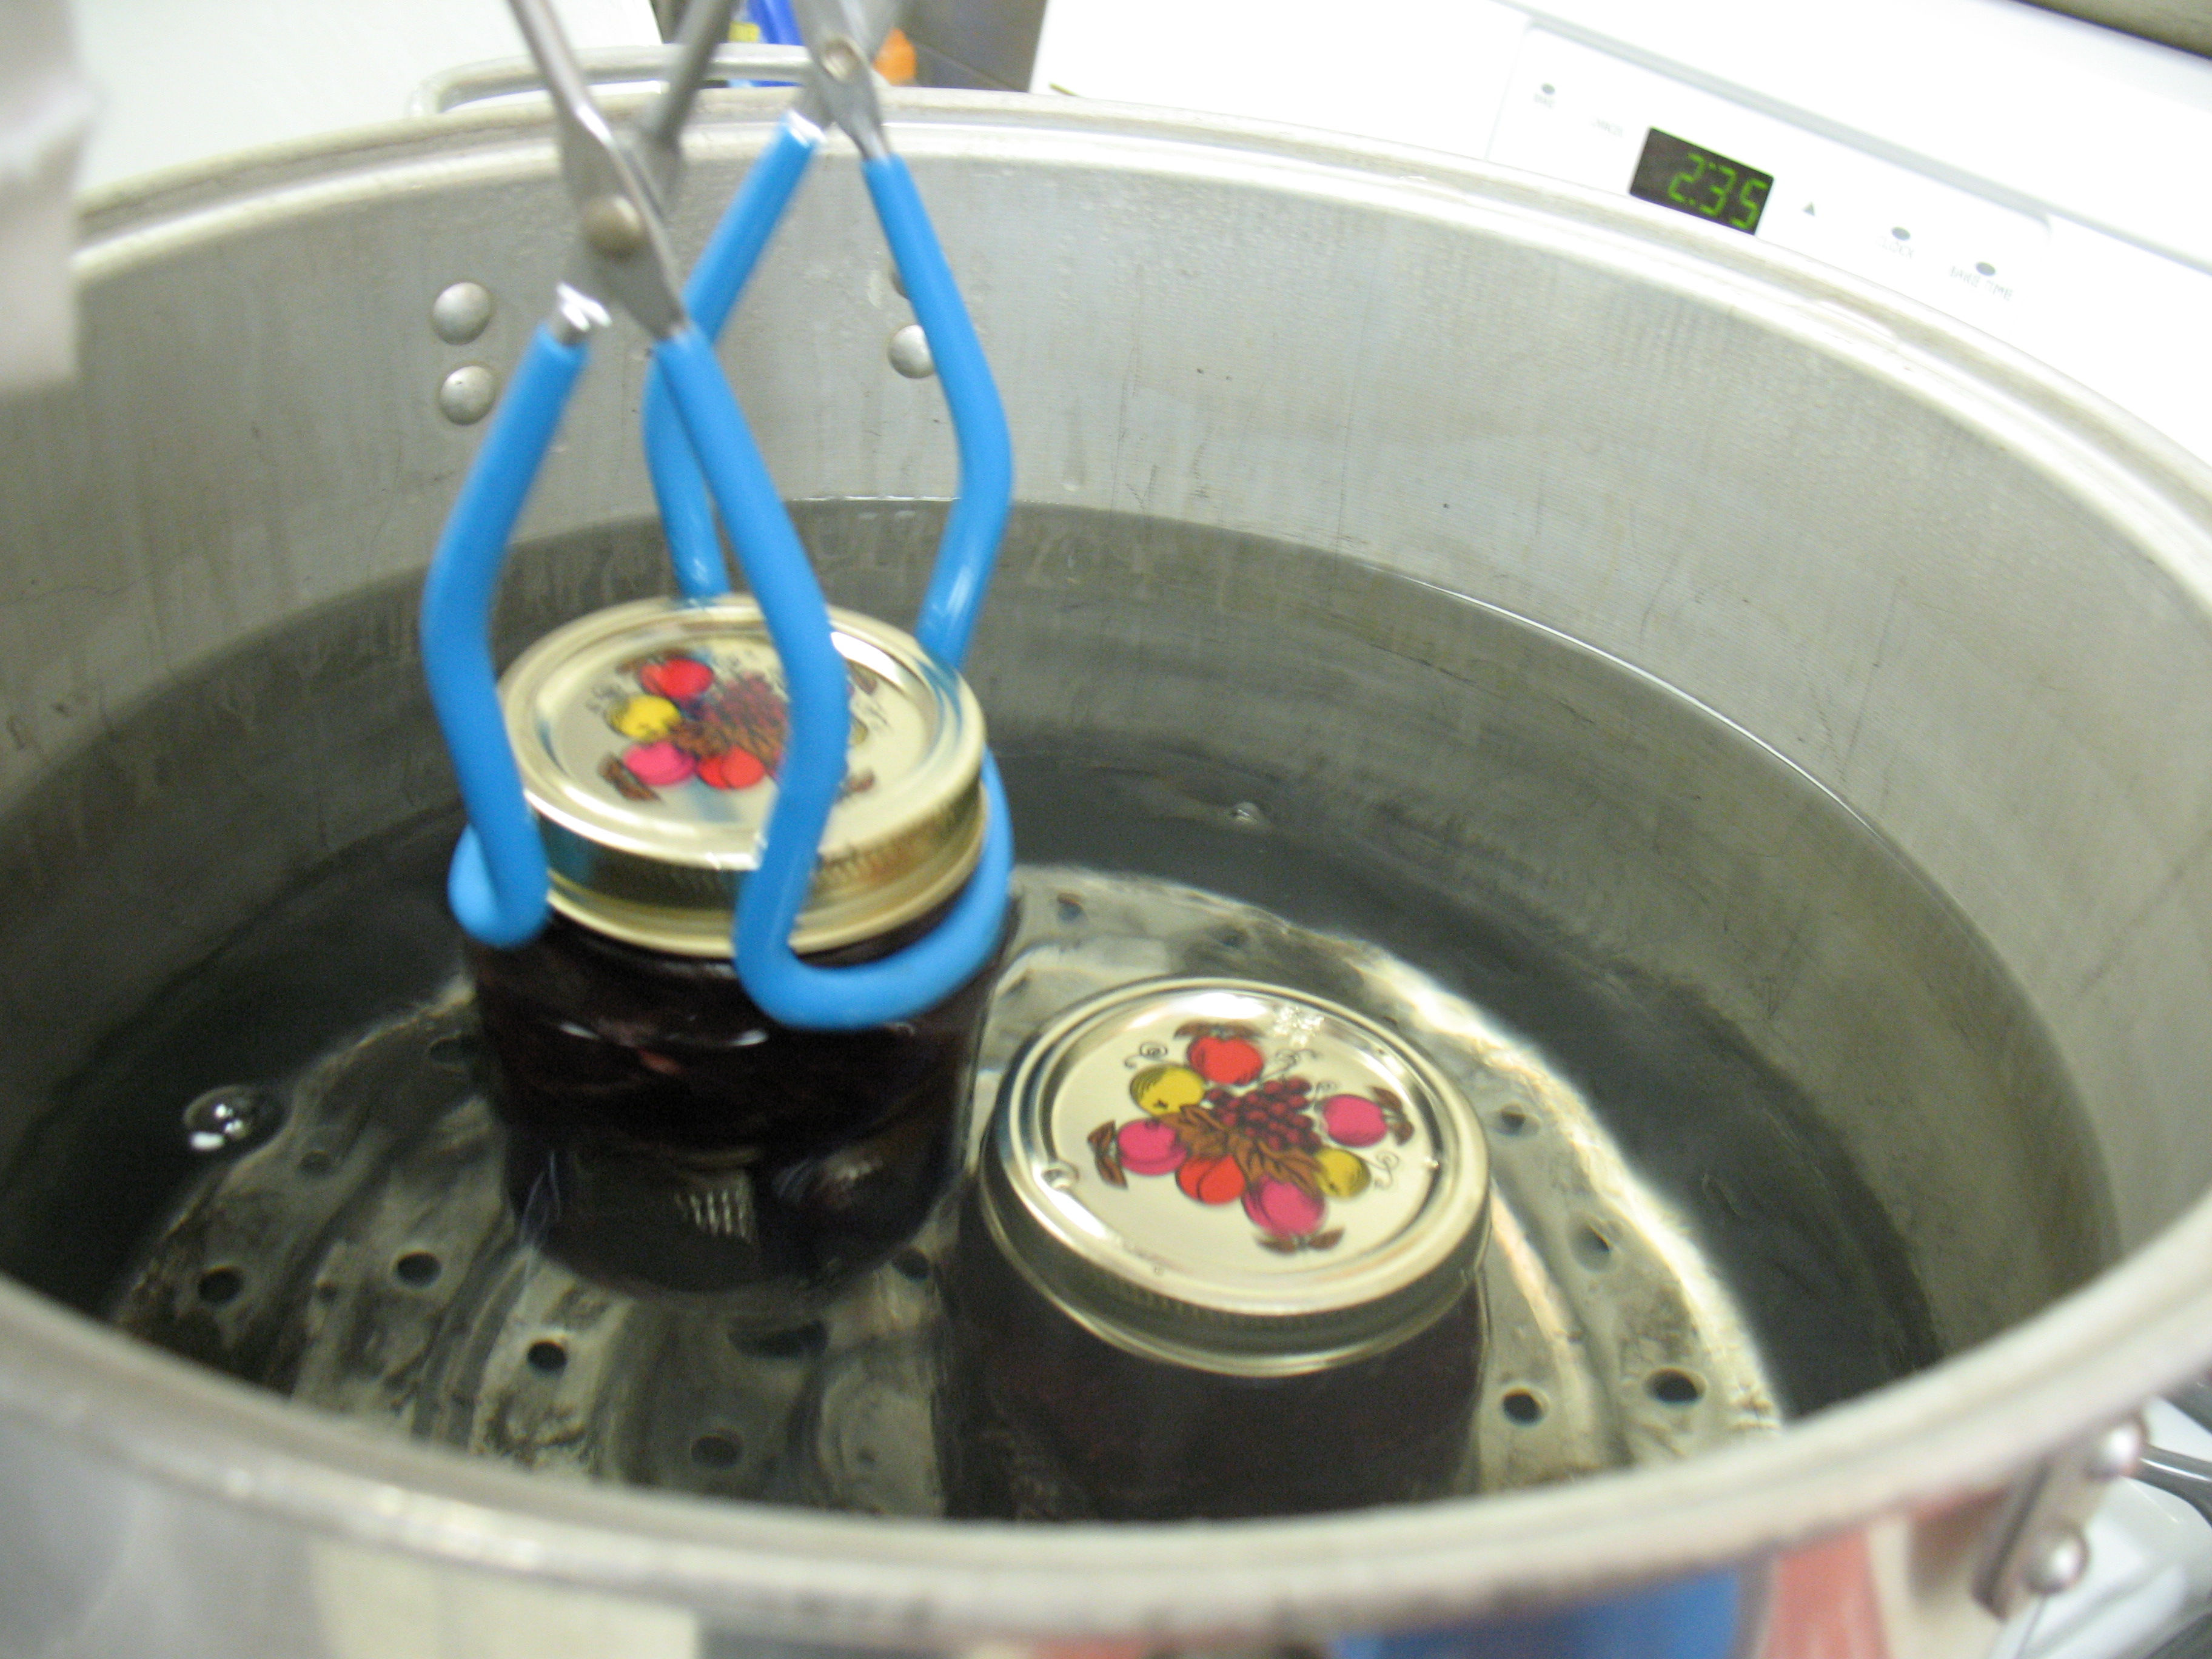
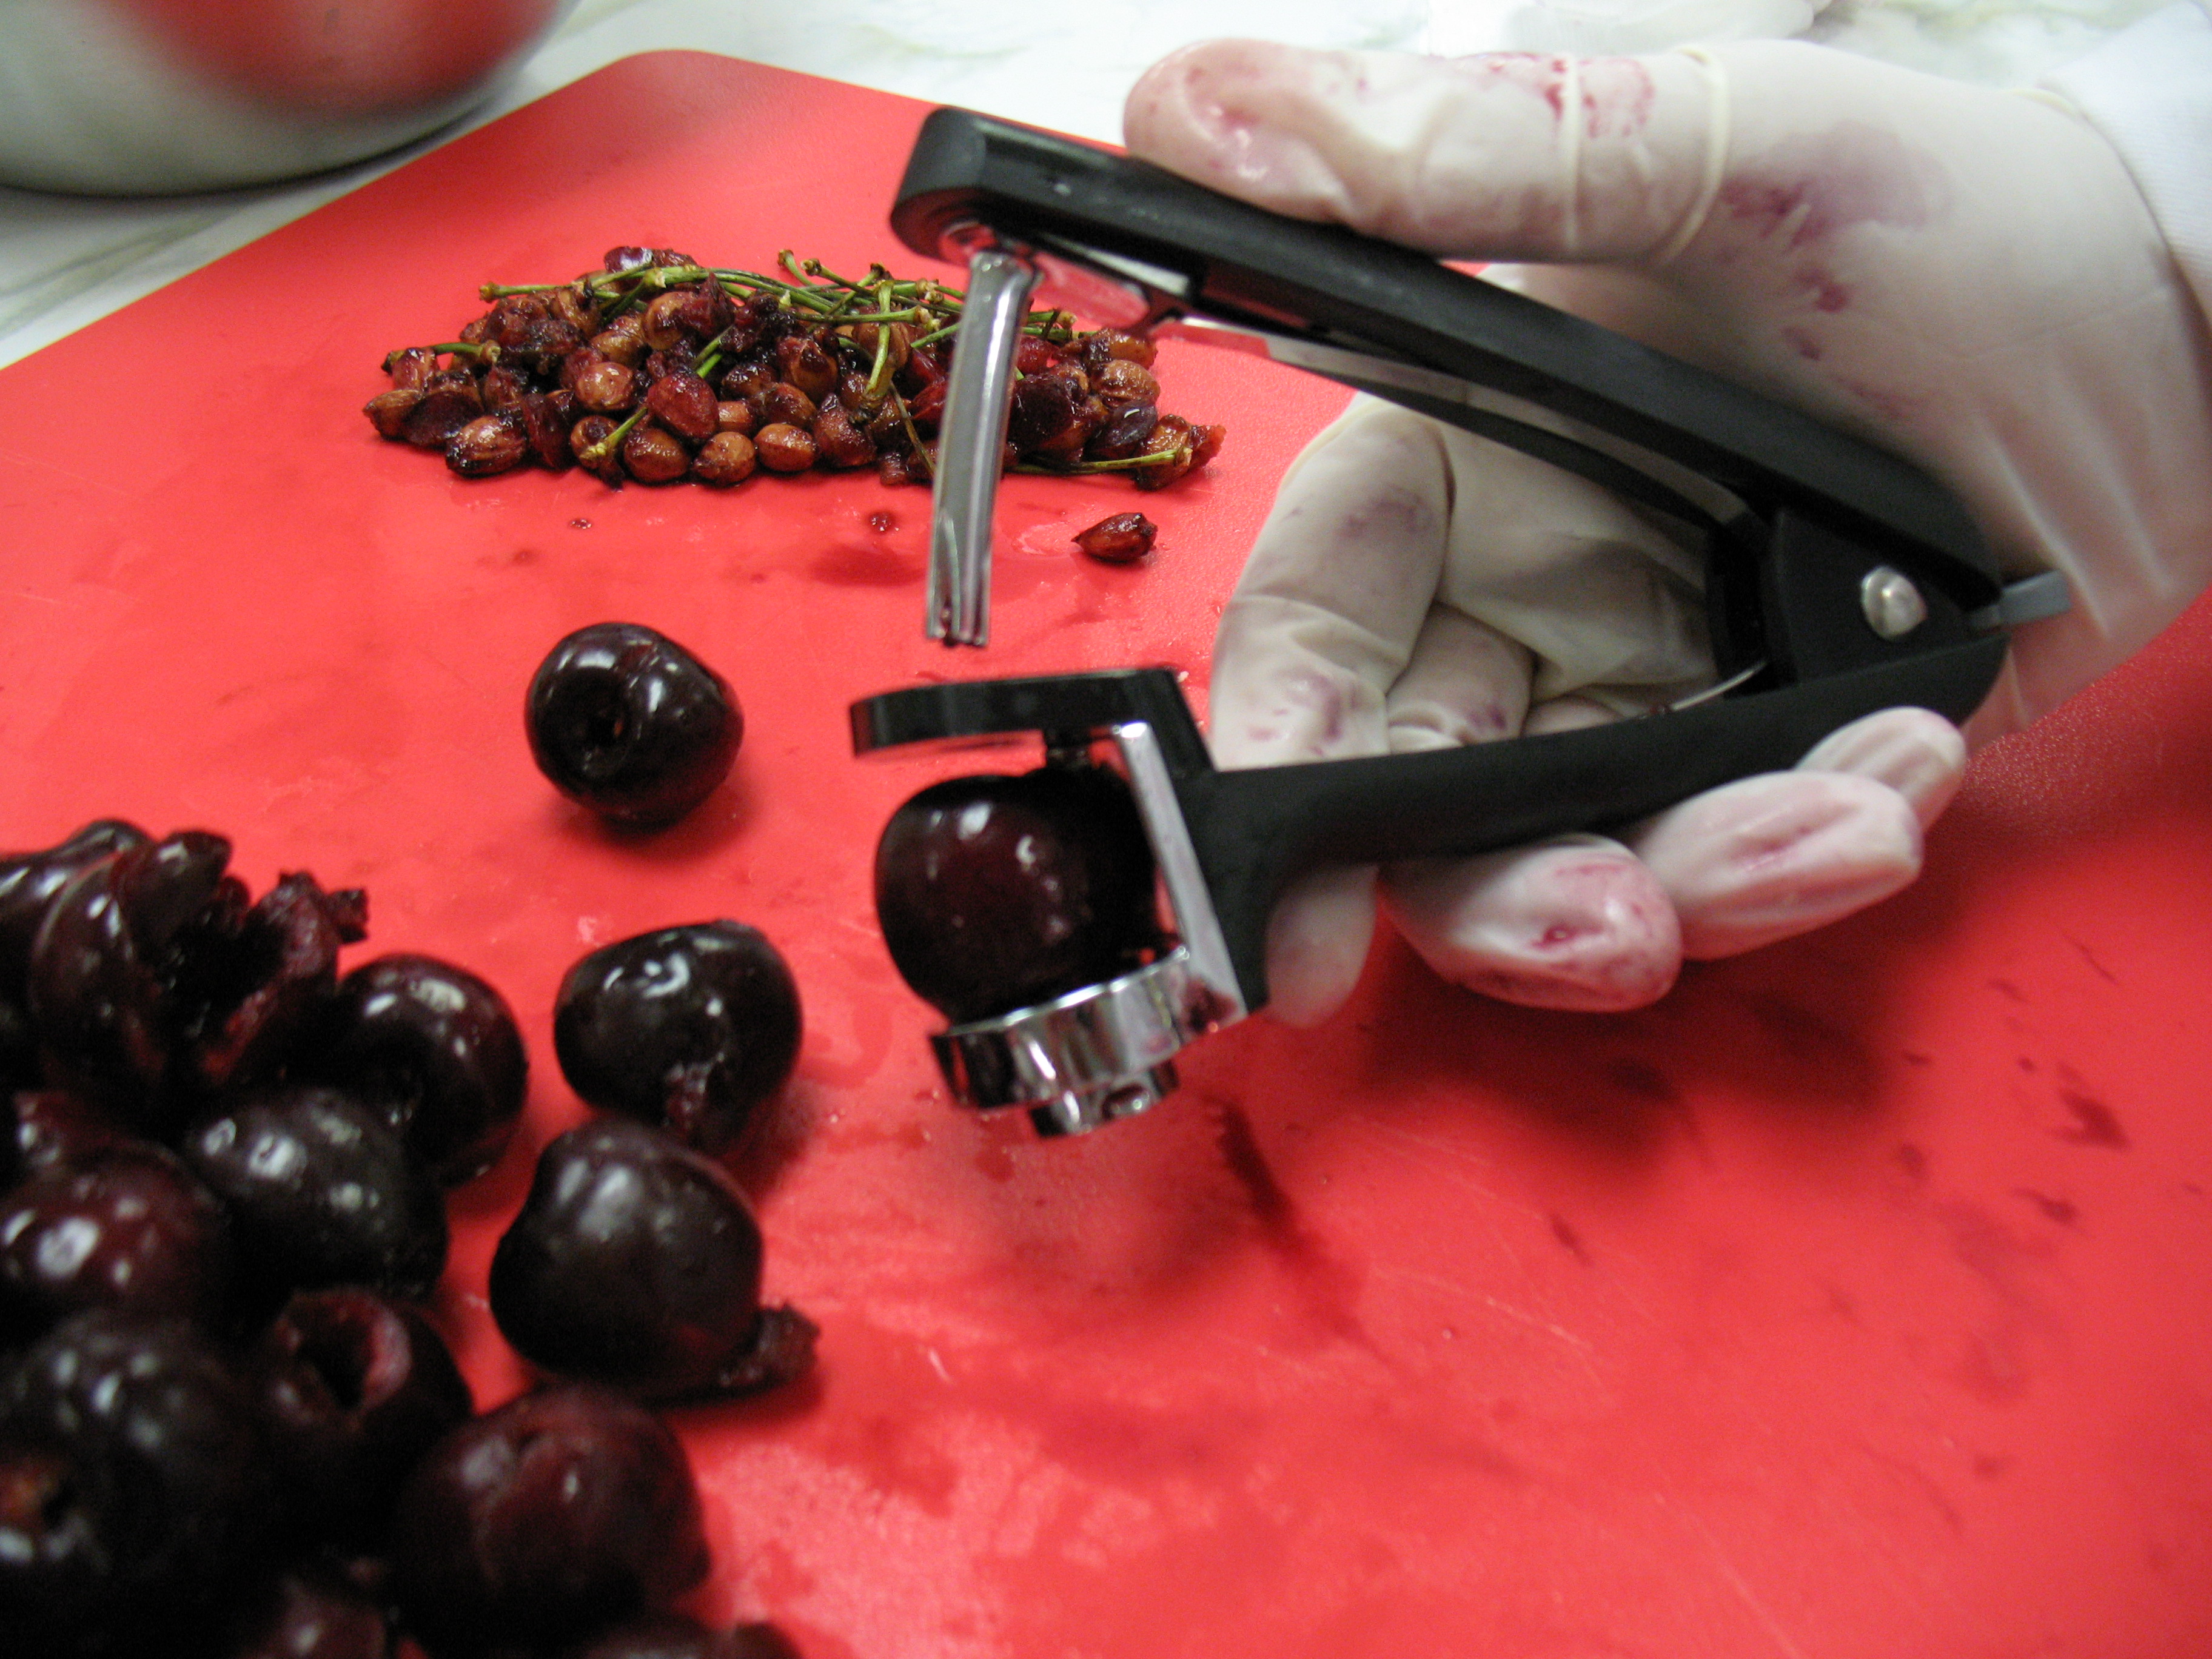
Another option for sour cherries is to can Sour Cherries – Whole. And, the very same procedure and process times are used to can Sweet Cherries – Whole. You could even mix sweet and sour cherries!

For an extra sweet spread option, can Sweet Cherry Topping, made with Bing cherries, water, sugar, and liquid pectin.

Cherry Syrup is another way to make and can a sweet topping, this one more pourable/liquid-like and less spreadable/solid-like than the Sweet Cherry Topping, above. You may use any type of cherry for the syrup.

Boiling Cherries into SyrupLowering Jars into Canner

In case canning is not your preferred preservation method, you could freeze your Sour Cherries or Sweet Cherries. The difference between the two is due to balancing the flavor of sour cherries with slightly more sugar. Sour cherries can be packed in 50% sugar syrup or a sugar pack, whereas sweet cherries are packed in 40% sugar syrup or a dry pack, no sugar added.

Last but not least, Dried Cherries make a great snack, either plain or as an ingredient in fancy trail mix with nuts and chocolate pieces. Drying cherries takes just a few steps – start with ripened cherries and stem, wash, drain, and pit them, leaving whole, halving or chopping as you please. Whole cherries need to be dipped in boiling water until skins split to help moisture escape while they dry. For sour cherries, you will syrup blanch them for 10 minutes. Make sure you have 24-36 hours available to check on the cherries as the complete the drying process in a dehydrator.

Do I need to pre-sterilize my jars before canning?

Even when you purchase brand and shiny new jars in a box covered in plastic wrap, those jars are still not in a sterile environment. In addition to contamination by microorganisms that cannot be seen with our bare eyes, packaged jars may accumulate dust, small bits of debris, and even chips of glass in the case of breakage (which does happen sometimes in all the steps of transport from factory to store to home).

Whether brand new or re-used many times over, you should always clean jars just prior to filling them when canning. Wash jars in a dishwasher or by hand, using detergent and rinsing well. Clean jars should then be kept warm prior to filling.  You can leave them in the closed dishwasher after the cycle, place them in your canner as it is preheating, or create a separate water bath to keep jars clean and warm.

Washing is also a good time to inspect jars for any cracks or chips, discarding or re-purposing those jars for non-canning uses if any imperfections are found. If you see scales or film from hard water left on your jars, then remove this by soaking jars for several hours in a solution containing 1 cup of vinegar (5% acidity) per gallon of water.

burner on high for bringing water to a boilIn order to actually sterilize jars, they need to be covered by boiling water for 10 minutes (at sea level…see note about altitude adjustment, below). When a process time is 10 minutes or more, the jars will be sterilized DURING processing in the canner. Therefore, when process times are 10 minutes or more, pre-sterilization of jars is not needed. It doesn’t hurt your product to do it anyway, but it does require additional time and energy and is unnecessary.

To pre-sterilize jars, place the cleaned jars right-side-up on a rack in a canner and fill the jars and canner with water to 1-inch above the tops of the jars. Bring the water to a boil and then boil for 10 minutes at altitudes less than 1,000 feet elevation.  Add 1 additional minute for each additional 1,000 feet of elevation. When you are ready to fill the jars, remove the jars one at a time, emptying the water from them back into the canner.  This will keep the hot water in the canner for processing filled jars.

timer set to 5 minutesSometimes people choose to increase a 5-minute process time for certain jams and jellies to 10 minutes so that they do not have to pre-sterilize the jars.  The extra process time is not harmful to most gels and spoilage should not be an issue as long as the filled jars get a full 10-minute treatment in boiling water.  (And remember your altitude to increase this process time as needed.)

So, in summary:

Is a 5-minute process time enough to sterilize jars? No. If you are using a process time of only 5 minutes, such as for some jellied products, then you need to pre-sterilize jars before filling them (or increase the process time to 10 minutes, plus any altitude adjustments).

If a process time is 10 minutes or more (at sea level) then will the jars be sterilized? Yes, but be sure to wash and rinse them well, and keep warm, before filling them with food.

Do you have a smooth cooktop and still want to can at home?

smooth stove top drawing


If you have a smooth cook-top and the manufacturer says not to can on it, don’t give up on canning at home quite yet. Consider these alternatives instead: either purchase and install a permanent set of electric coil or gas burners as a range top (without an oven) or purchase a portable electric coil or gas burner.

Cost is one notable difference between the two options. An installed range top can be quite expensive as a second range top, especially as it requires proper utility connections to support it.

As for portable burners, they are not all alike and not all portable burners are appropriate for canning.  Before buying or using a any burner for canning, check the manufacturer’s product information or contact their customer service to find out if that particular burner is appropriate to use for canning.

We cannot endorse a particular brand, but here are a few basic guidelines for you to keep in mind when selecting a portable burner for canning purposes:

– The burner must be level, sturdy, and secure. Look for enough height to allow air to flow under the burner, but not such that it will become unsteady with a full, heavy canner resting on it. One we have tested was about 4 inches high off the counter top, on short legs that allowed air circulation underneath but was plenty stable.

– Look for a burner diameter that is no more than 4 inches smaller than the diameter of your canner. In other words, the canner should not extend more than 2 inches from the burner on any side. This is a common recommendation, but also make sure this is the recommendation for your canner and burner brand.

– For electric burners, you want the wattage to be about equal to that of a typical household range large burner.  We have been successful bringing a boiling water canner to boiling with one that is 1500W/120V, but household range burners are more typically 1750W or higher and this kind of wattage may actually be a better choice if you can find it. We have not yet tried using a pressure canner on a portable electric burner.

– You want the burner to have housing that will hold up to the high heat under the canner for long heating periods, and not damage counter tops with reflected heat. We contacted a food-service supply store to help us identify one like this; it cost us about $155. We used it successfully a few times to bring water to a boil, but have not used one repeatedly for canning.

– At least one pressure canner manufacturer advises not to can on an outdoor low pressure gas burner/gas range burner over 12,000 BTU’s. Your pressure canner can be damaged if the burner puts out too much heat. Higher BTU burners could also produce so much heat that the recommended come-up time for canning could be altered, potentially producing an unsafe final product.

– Again, check manufacturer’s directions and/or contact their customer service for more information about appropriate burners. When you are asking manufacturers about canning, specify whether you are asking about pressure canning (much more heat concentration) or boiling water canning. If the manufacturer’s directions have been followed, and canning problems occur, then you must take it up with the manufacturer.

What is a vegetable, a crayon color, an entire genus, and a type of pickle?

asparagus tipsAsparagus!

Commercial production of the popular vegetable Asparagus officinalis harvests primarily from January to June, but its growing season across the U.S. is likely to begin closer to mid-April and last 6 to 8 weeks. Asparagus is unique in that you have to wait about 3 years from seed planting until first harvest, so make sure you do your research before growing it for the first time. Once you do get your hands on some fresh spears, one way or another, here’s a delicious way to make them last all year:

Pickled Asparagus

For six wide-mouth pint jarswashed asparagus

10 pounds asparagus

6 large garlic cloves

4½ cups watercutting asparagus

4½ cups white distilled vinegar (5%)

6 small hot peppers (optional)

½ cup canning salt

3 teaspoons dill seed

  1. Wash and rinse canning jars; keep hot until ready to use. Prepare lids according to manufacturer’s directions.
  2. Wash asparagus well, but gently, under running water. Cut stems from the bottom to leave spears with tips that fit into the canning jar with a little less than ½-inch headspace. Peel and wash garlic cloves. Place a garlic clove at the bottom of each jar, and tightly pack asparagus into jars with the blunt ends down.
  3. In an 8-quart Dutch oven or saucepot, combine water, vinegar, hot peppers (optional), salt and dill seed. Bring to a boil. Place one hot pepper (if used) in each jar over asparagus spears. Pour boiling hot pickling brine over spears, leaving ½-inch headspace.
  4. Remove air bubbles and adjust headspace if needed. Wipe rims of jars with a dampened, clean paper towel; apply two-piece metal canning lids.
  5. Process in a boiling water canner according to the recommendations in the table below. Let cool, undisturbed, for 12 to 24 hours and check for seals.

Pickled AsparagusAllow pickled asparagus to sit in processed jars for 3 to 5 days before consumption for best flavor development.

Recommended process time for Pickled Asparagus in a boiling-water canner.

Process Time at Altitudes of

Style of Pack

Jar Size

0 – 1,000 ft

1,001 – 6,000 ft

Above 6,000 ft

Raw

12-ounce or Pints

10 min

15

20

Visit the NCHFP website for recipe quantities to make seven 12-ounce jars and links to more information about Using Boiling Water Canners and Principles of Home Canning.

Recipe developed at The University of Georgia, Athens, for the National Center for Home Food Preservation. Released by Elizabeth L. Andress, Ph.D., Department of Foods and Nutrition, College of Family and Consumer Sciences. October 2003.