Category Archives: Drying

Looking for a Gift that Keeps Giving? Try a Dehydrator!

Trays with fruits and veggies

For your “foodie” friend or family member, a dehydrator might make a great gift. Effective and efficient at drying apple slices, chili peppers, figs, fruit leathers, jerky and more, food dehydrators are a favorite appliance of avid home food preservers.

Why not just use an oven? Using an oven may be reasonable option, but not all ovens maintain a temperature low enough to dry without baking (140 degrees F). Oven drying also requires leaving the oven door cracked open with a fan blowing to provide circulation, requiring a substantial input of energy and time. Dehydrators are small, counter-top appliances designed to dry foods quickly using an electric element for heat and a built-in fan and vents for circulation.

Dehydrators w copyright symbol

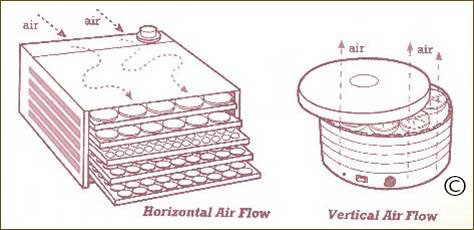
There are two main types of dehydrators: units with horizontal air flow and units with vertical air flow. Horizontal air flow design places the heating element and fan on the side of the unit, whereas vertical air flow design contains the heating element and fan at the bottom of the unit. The limited capacity of horizontal flow models can be a disadvantage, while most vertical flow models allow for more trays to be stacked on top of one another. The height of food pieces is more limited with the vertically stacked trays, however, as compared to some horizontal flow cabinets.  Also on the plus side, models with horizontal flow reduce flavor mixture if you are drying different types of foods at the same time, and heat is distributed evenly across all trays.

You can find dehydrators in natural food stores, the small appliance section of department stores, and mail-order catalogs. Costs vary. Before buying the first one you come across, consider this list of dehydrator features to look for:

–          Enclosed heating elements

–          Fan or blower

–          An enclosed thermostat

–          Double wall construction of metal or high grade plastic

–          Four to 10 open-mesh trays made of sturdy, easy-to-wash plastic

–          UL seal of approval

–          One-year guarantee

–          Convenient service available if needed

–          Dial for regulating temperature

–          A timer that can be set to turn unit off (very helpful when drying lasts into the night)

–          Availability of tray liners to purchase for making fruit leather if desired

Dryer with Liner

© Andress, E.L., Harrison, J.A., eds. (2006). So Easy to Preserve, 5th ed. Athens, GA: University of Georgia Cooperative Extension.

The Hunt is On: Know the Basics of Venison Preservation

Exact dates for deer hunting season vary across the United States, but wherever you are, fall is the time of year that deer are most active and most actively hunted. To help you make the most of your wild game, here are a few tips and recommendations (follow the links below) for safely preserving the highest quality venison.

Sanitation begins in the field. Be careful not to contaminate the carcass when field dressing the deer. Cool the meat to 35 to 40 degrees Fahrenheit as quickly as possible.

Proper aging reduces the game taste, tenderizes tissues, and gives the meat better cutting quality. Never age meat at room temperature. Age meat at an air temperature of 40 degrees F or less for no more than 2 to 3 days in a clean, dry, well-ventilated storage facility. If you are making sausage, then aging is not needed.

Refrigerated meat needs to be used within 2 to 3 days.

Freezing Venison:

Fat goes rancid quickly, so trim fat and clean cuts. For best quality, separate into meal sized portions (usually about one pound) then either use a vacuum sealer or wrap the meat tightly in waxed paper, plastic freezer wrap, aluminum foil, or plastic freezer storage bags, and if not already sealed then seal in a freezer bag or container. Remember to label and date each package. Freeze quickly at 0 degrees F or below. At this temperature, store venison for up to 9 to 12 months.

Labeling plastic freezer bag

Venison Sausage:

Breakfast-type Sausage

Summer Sausage and Smoked Sausage

Quick Sausage and Wild Game Polish Sausage (page 9)

Canning Venison:

Strips, cubes, or chunks

Mincemeat

Chile Con Carne (substitute venison for beef)

Curing/Smoking Venison:

Corning; Sweet and Hot Pickle Cure

Dry Curing Game

Venison Jerky

Pieces of meat on dryer trayEnjoy! jerky

Information in this document is based on Resources for Home Preserving Venison by Brian Nummer and Proper Care and Handling of Venison from Field to Table by Penn State Cooperative Extension.

Preserving the Fickle Fig

Whole and sliced figsFigs can be perfectly ripe when you pick them from the tree, then just a few days later they are notably far less appealing. With an extensive history of cultivation and consumption, fig trees provide us with fruit that is often preserved in order to extend its revered but fleeting qualities of flavor and texture.

Although a fruit, figs also display a borderline pH value for preserving as an acid food. Most fruits are clearly acid foods, with a pH below 4.6. (Vegetables, by the way, tend to be low acid foods, with pH values above 4.6.) Just a few fruits, figs among them, naturally range in pH right around 4.6, making them a borderline acid/low acid food since the pH can go above 4.6. Therefore, to be safely processed in a boiling water canner, some acid needs to be added to figs to keep them safe from botulism risk. You will see in the recommendations below that lemon juice or citric acid must be added, in the amounts called for, to home-canned fig products.  These acidification levels were determined through research.

Here are a few tested recommendations for preserving figs to try the next time you find yourself with fresh figs on your trees, or in your hands:

Fig Preserves is the recipe to use if you want to keep the plump fruits whole. This is a traditional southern-style whole fruit preserves, not a spread like jam. Fig Jam without added pectin directs you to chop the figs, and contains less sugar and less lemon juice than its crushed-fruit, pectin-added counterpart, Fig Jam with liquid pectin. If you’re willing to mix fruit flavors, then you might like to try Strawberry-Fig Preserves, which uses gelatin to help obtain a gel.

Another option for canning is to make Fig Pickles!

You may also choose to Freeze your figs. Unlike when canning, acid does not need to be added to figs in order to safely freeze them. However, it is suggested that lemon juice or ascorbic acid is added for the purpose of preventing discoloration and maintaining the highest quality of the figs.

Fresh fig halves on dryer trayFigs are excellent fruits for drying. To dehydrate figs, select fully ripe fruit and wash or clean the whole fruit with a damp cloth. Leave small fruit whole, and cut larger fruit in half. You should pretreat figs to be left whole by “checking” them.  Dip them in boiling water for 30 seconds or until skins split, then plunge them in ice water to stop further cooking. Be sure to drain them well on paper towels before loading them onto dehydrator trays and drying them for 6 to 12 hours.  The moisture inside the figs needs an escape route for drying out before intact skins would get too tough and dry.

Dried green figs

To learn more about dehydrating, please read Preserving Food: Drying Fruits and Vegetables.

From One Home to Another…

…how to get your homemade foods to loved ones’ homes.

Chances are that you have someone on your gift list that doesn’t live in your home, or even in your neighborhood, city, or state. But if you’ve made amazing food products then you probably want to share them with everyone you love- including those who are far away! You might have concerns not only about proper packaging, but also about food safety and shelf life. So, a few mail order tips for you to keep in mind, from the USDA Food Safety and Inspection Service:

Jams, jellies, and pickles will last a year if unopened, so the major concern is proper padding in shipping packages so that no containers break open. Remember to mark the package as “Fragile”.

If your homemade goodies have a suggested shorter shelf life, be sure to tell the recipient. For example, whether unopened or opened, dried fruits are recommended to be consumed within one month at room temperature, and six months if kept refrigerated.

If you’re dealing with perishable food items, then you’ve got more immediate food safety concerns. Ideally, send items as quickly as you can and mail them with overnight delivery. Let your lucky recipients know that the gift is on its way, and label packages with “Keep Refrigerated” to remind them. Send packages at the beginning of the week (or at least not the end of it) so that they do not sit in the mailing facility over a weekend.

Most meat, poultry, fish, and dairy products (like cheesecake, yum) are especially perishable and must be handled in a timely manner or else the risk of foodborne illness is very high. Generally, these items must be packed cold or frozen, packaged with a cold source (frozen gel packs or dry ice), and boxed in corrugated cardboard. If meat or poultry arrives at higher than 40°F, as measured with a food thermometer, then it should not be eaten. 40°F to 140°F is the “Danger Zone” for perishable foods, because if they are held at in this temperature range for longer than two hours, then dangerous pathogenic bacteria can grow rapidly.

Some meat and dairy products are exceptions, and do not require refrigeration when properly packaged and unopened. These items include hard salami, hard cheese, and country ham.

If you have more questions, whether you be the sender or the recipient, contact the USDA Meat and Poultry Hotline with questions about meat, poultry, or egg products: 1-888-MPHotline (1-888-674-6854), or the FDA Outreach and Information Center with questions about any other foods: 1-888-723-3366.

The information in this entry comes from the Mail Order Food Safety Factsheet by the United States Department of Agriculture Food Safety and Inspection Service.