Monthly Archives: April 2013

Plan to can so your summer won’t be a bummer

1,2,3 calendar

Whether you’ve been canning for decades or are just learning how to can for the first time, proper equipment in good condition is required to make safe, high quality canned foods at home. To save money, time, and frustration once the harvest is ready, plan ahead now for successful home canning all summer long.

If you’ve not yet purchased your needed equipment, there are two types of canners to consider: boiling water canners and pressure canners. A boiling water canner is used for canning acid or acidified foods like fruits, pickles, jams and jellies. Boiling water canners cost $15-$35, or can be assembled with a large stock pot, secure lid, and rack to keep jars off the bottom of the pot.

A pressure canner is what you’ll need for canning low acid foods such as vegetables, meats, fish, and poultry. Pressure canners are essential for safe canning of low acid foods. Temperatures inside pressure canners reach higher than in boiling water canners (240°F and above as compared to about 212°F). These high temperatures are necessary to kill the toxin–producing spores of the bacteria Clostridium botulinum.

You get to choose between two types of pressure canners: a dial gauge canner or a weighted gauge canner. The canners work the same way, but have different types of gauges to indicate the pressure inside the canner. Expect to spend $100-$150 or more on a pressure canner.

dial=gauge pressure canner Presto Pressure Canner

If you use a dial gauge canner, then it’s important to have it tested for accuracy before each canner season. Local hardware stores and your local Extension agent may be able to help you with this task. For either type of canner, check that the rubber gasket is flexible and soft, and if it is brittle, sticky, or cracked then replace it with a new gasket. Also check that any openings, like vent ports, are completely clean and open.

You’ll also need jars, lids, and ring bands. When getting started, new jars are a worthwhile investment (versus purchasing used jars from a yard sale or flea market) because very old jars may break under pressure and heat. Mason-type jars with two-piece self-sealing lids are recommended in USDA guidelines. Jars, with lids and ring bands, cost between $5-$17 per dozen depending on the brand and size. Look for manufacturer’s coupons, store specials and online discounts.

Once you have jars you’ll want to check them carefully before each use for cracks or chips, especially near the top sealing edge. Similarly, check ring bands for dents, bends and rust. Both jars and ring bands are reusable until they show these aforementioned signs of wear. Standard metal flat lids are designed for one use only, so discard any used lids and buy new flat lids.

 Jars, bands, and more

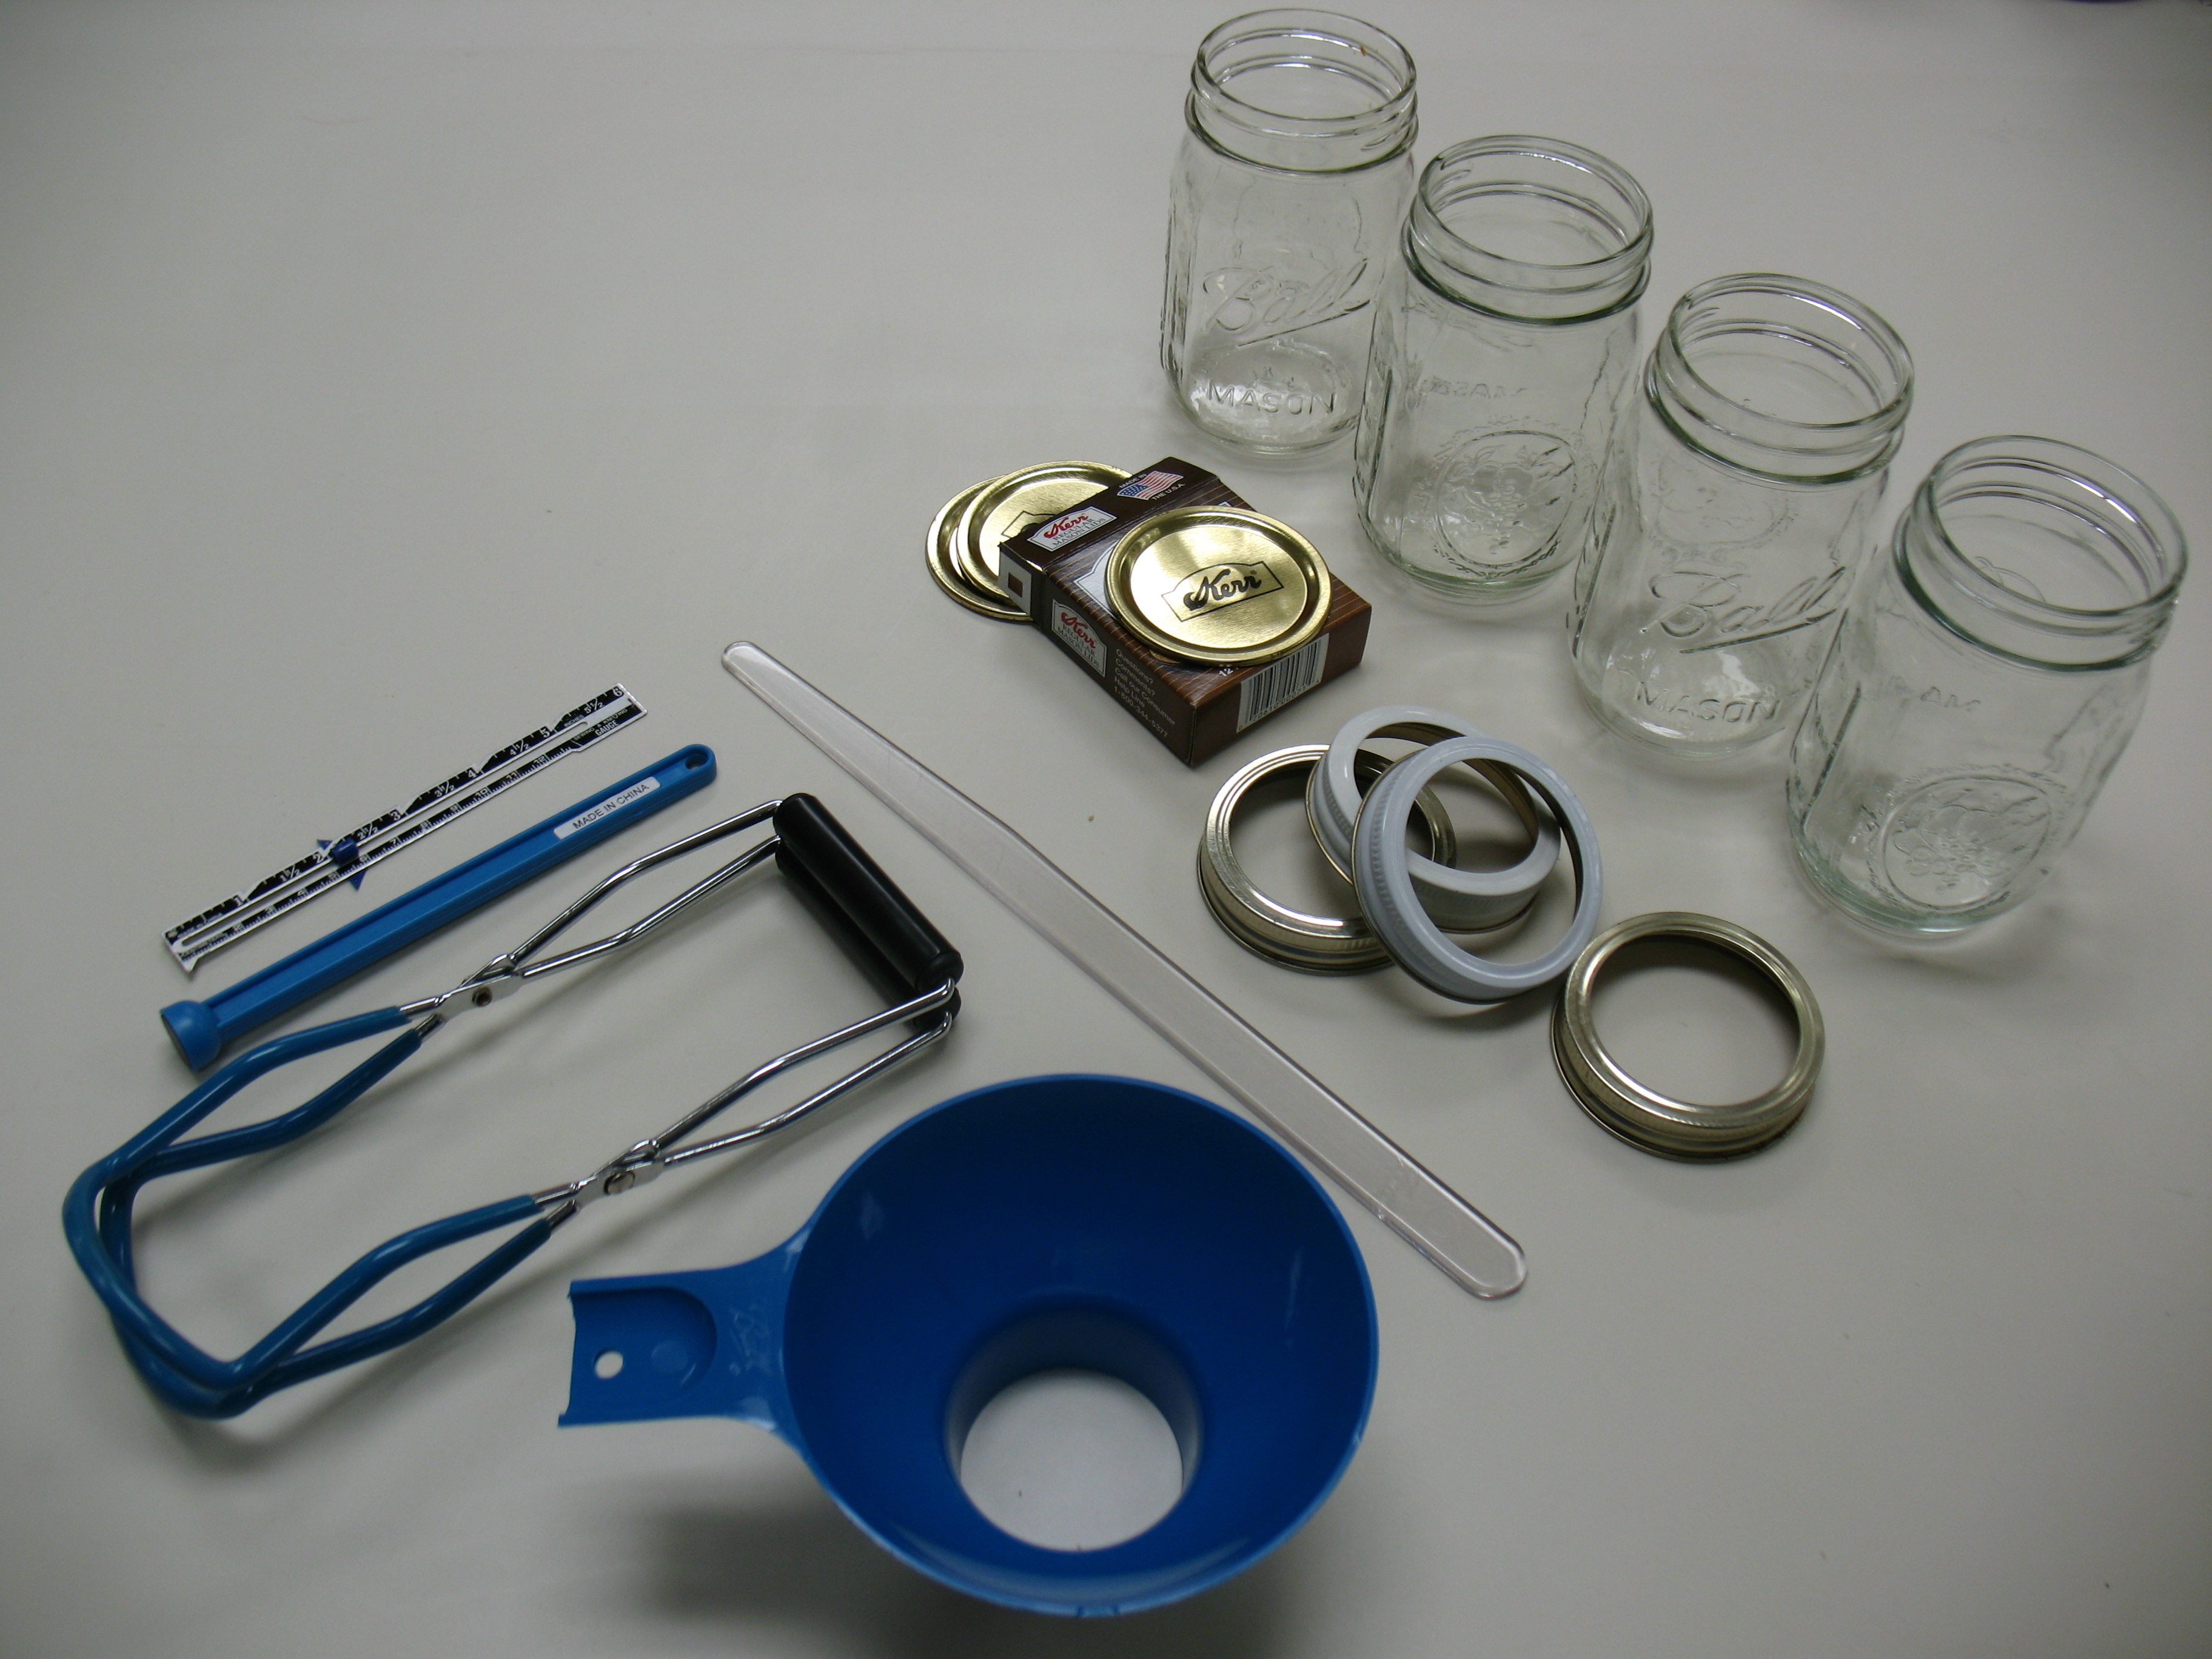
In addition to standard cooking utensils like cutting boards and bowls, a jar funnel, jar lifter, lid wand, headspace tool, and bubble-freer are items that you will want to have handy for canning.

Lastly, find recipes and instructions for what you want to can. Specific kitchen equipment or ingredients could be needed to follow directions for food preparation. Reliable, up-to-date canning instructions are available at the NCHFP website, the USDA Complete Guide to Home Canning, So Easy to Preserve, or your county Extension office.

This entry is a modification of ‘Plan Ahead for Home Canning this Summer’ by Dr. Elizabeth Andress and contains information from ‘Cost of Preserving and Storing Food’ by Colorado State University Extension.

Why can’t I can what companies can?

As a home canner looking for new recipes to try out, you might sometimes be inspired by commercial products found on grocery shelves. But even after scouring through all your recipe books, magazines, and online resources there are still some products for which you cannot find home canning recommendations. Why is this? What do these companies have that you don’t?

Well, in summary, companies have two things that home canning does not have: 1) special equipment and 2) lots of money for research.

Commercial facilities have industrial equipment that can reach higher temperatures more quickly than what can be achieved at home. With specialized equipment, they are also able to control the consistency and maturity of ingredients. This control reduces the variability of the canning process, which allows for more reliable research (and therefore more product development) than can be done for home-canning practices.

Companies pay to conduct expensive research in order to determine safe product formulas and processing methods for each and every product. Even if just one ingredient is added to an already approved product, that new recipe must be carefully tested before being manufactured for sale. Acidity levels, water activity, and heat penetration are all critical factors influencing processing times, and these factors vary greatly among different recipes.

Proper studies to establish processing times for both commercial and home-canned recipes are crucial to the safety of canned foods. Without proper processing times, there is significant risk of botulism resulting from under-processed canned foods, especially low acid foods. Experimentally determining safe processing times requires a lot of time and money, and there is no easy formula to take into account the way that each product heats in each canning situation. Commercial and home-canning processes are not interchangeable. That is why there are fewer recipes and processes for home canning than many people would like.

For more information about heat processing of home-canned foods, read this ‘Backgrounder’ by Elaine M. D’sa.

Freezing Fruits for Summer Smoothies

Springtime often brings warm sunshine, cool breezes, fresh fruits…and the opportunity to plan refreshing treats for the hot summertime ahead. Fruit smoothies in the summer are not only a welcomed way to cool down but are also nutritious, delicious, and easy to prepare. Due to the popularity of smoothies, recipes are easy to find; look online, on product packaging, and in books and magazines. Once you get the hang of it you’ll be making recipes of your own.

A medley of frozen fruits from our global food suppliers helps you mix-and-match a variety of flavors with fresh fruits and berries that will be ready for harvest later in the season. Fruits like bananas, pineapple, and mango are not typically grown in the United States, but are available year-round at grocery stores. These three fruits in particular add consistently tasty flavor and texture to smoothies. Keeping them frozen allows you to use them in smoothies as you would otherwise use ice cubes- but fruit “ice cubes” pack a lot more flavor than regular ice cubes!

Freezing these fruits for smoothies is simple:

–          Make sure your freezer is set to 0°F or below.

–          Select fruits that are mature, ripe, and at their peak of freshness.

–          Work under sanitary conditions; freezing does not destroy enzymes or kill microorganisms, it just slows their effects.

–          Peel fruits, remove cores or seeds as needed, then slice into chunks about the size of regular ice cubes.

Pieces of Fruit on Tray for Freezing

–          Enzymes may still cause browning of fruits, so you may want to add ascorbic acid, citric acid, or lemon juice before freezing. Refer to http://nchfp.uga.edu/how/freeze.html for exact quantities.

–          You might also want to place the fruit pieces on cookie sheets or trays to freeze them individually before packing them for storage. This step makes it easier to separate them for use.

–          Store the pieces of fruit in a rigid container or plastic bag that holds one half-gallon or less so that all pieces freeze fast enough to produce a satisfactory quality. Choose containers that are moisture-vapor resistant, durable, leak-proof, easy to seal, and easy to mark. Label with the type of fruit and date for easy identification.

OLYMPUS DIGITAL CAMERAFrozen Fruits in Rigid Containers

Depending on where you live and from where you get your fruit, you might already be seeing strawberries fresh off the vine. Sooner or later you might also have fresh peaches, raspberries, blueberries, and/or blackberries. Whatever your local flavor, having some frozen fruits stored in the freezer will allow you to blend a fresh, cold smoothie whenever you like!